

Introduction: 6.3 KiloWatt Ground Mount Home Solar Array


For several years, I have toyed with the idea of installing my own solar array. In that time, I have done a lot of reading and research. I have eyed systems on Amazon, Wholesalesolar, and Ecodirect. I finally purchased 4 panels after getting bids from several places and installed them on my roof. This was my "pilot" project. A proof-of-concept to show my wife that it wasn't that difficult, I could do it, and it would save money.
I finally convinced her it would be a worthwhile project to add 24 ground-mount panels in late fall of 2016 because 1) The $2000 state tax credit has a high likelihood of getting phased out in 2017, 2) I found a very reasonably priced source for panels and inverter, and 3) February is close, so the tax credits would be received with the tax return in just a few months.
I outline the steps I followed here in case others can benefit from lessons learned.
This kind of project is not for everyone. You are dealing with high voltages and/or currents. Things have to be designed and installed correctly as there is a risk of damage to property and lives. I am an electrical engineer and I have a brother-in-law, co-workers, and a beekeeper friend who are electricians. This is not a requirement, but was very helpful. The equipment used must be UL-listed and meet building code requirements. The power company requires a building permit to ensure everything is done correctly. For example, a back-feeding inverter could electrocute a power company employee working to repair downed power lines. If you are a DIYer, have your plans reviewed by someone who knows what they are doing!
Another excellent Instructable on the basics (a little more generic than mine) is located at https://www.instructables.com/id/DIY-Home-Solar-Pl...
If you like my project, please Vote for it!
If you are interested in pursuing a project and would like to speak to my "solar guy", send me a private message through Instructables and I will pass on his contact info.
Step 1: Planning

I had considered adding more panels to my roof. I even laid out how many and where my panels would go. But there are disadvantages to filling up your roof with panels (replacing shingles). There are advantages to a ground-mount system -- snow removal is easy and by utilizing a manual tilting system, my "solar guy" says I can produce 1 MegaWatt more per year than a similar roof-mounted system. This would require manually changing the angle several times a year - 0 degrees in summer, ~30 degrees in spring and fall, and 60 degrees in the winter (for Utah).
The disadvantages to a ground mount system as I saw at the time were the distance involved, which increased the voltage drop and required larger wires and additional cost. I would also need to trench ~400 feet.
Step 2: Sizing


You can find a lot of information about sizing solar array's online. I just need to say that for me, there is no incentive to size it larger than my average yearly usage. My solar guy provided a report that based on my location, I can expect about 11 MWh per year (11,000 kWh) of electricity from 24 255 Watt panels and a 6000 Watt inverter. I figure the 4 panels on my roof will make about 15% more. My power company provided a 2-year history of my usage when I created an online account. In 2014 I used 12.5 MWh, in 2015, it was 11.5 MWh. So I'm in the ballpark.
You can visit PVWatts, which is a database of locations and will estimate what your output would be based on the number and output of your panels.
Step 3: Net Metering Application
The regional power company, which owns the grid and supplies power to my home, does have a net meter program. They require a building permit to ensure everything is completed according to the building code. They require an application to participate in net metering. The information required is very basic, including the model of the inverter and the expected output of the system. They accepted the PDF application via email and acknowledged that they had received it. They also emailed when it was approved and gave me 9 months to complete the project. Net meter application attached.
Attachments

Step 4: Panel Orientation

You can find a lot about this on the Internet. But the solar guy convinced me with his demonstration that in areas that receive a lot of snowfall, the landscape orientation works best. He had a small fan connected to a panel. When he placed cardboard over the panel while it was in portrait orientation, the fan shut off with only about an inch of the panel covered. When he covered the panel in landscape, the fan continued to run until it was 2/3 covered. This has to do with the way the panels are wired internally. To make a long story short, all 3 internal circuits open when the bottom of the portrait-installed panel is covered. But 1 of the 3 internal circuits are still closed when the bottom 2/3 of the cells are covered on a landscape-installed panel. Yes, it only produces 1/3 or 2/3 of its potential, but it is still producing something.
I would guess 95%+ of array installations I have seen in Utah are done in portrait. It is much easier and faster to do a portrait-mode installation. But it will produce less electricity than a landscape installation. At some point, I plan on re-orienting my existing 4 panels on the roof.
Step 5: Obtaining the Building Permit


Step 2: Obtaining the building permit from the city.
Although I am an electrical engineer, I do not know the building code. With some help from the "solar guy", who is selling me the panels and inverter, I was able to get the building permit through the AHJ (Authority Having Jurisdiction). This is the guy who is the code expert and is contracted by my city to ensure my project will be done properly (at least according to him). Because permits are very specific to the local jurisdiction, I am not making my building permit available. I am sharing the single-line drawings. This step took hours and hours. It required my submitting it twice to the city, having two reviews, several conversations with the AHJ, and finally receiving back the permit with "redlines", or changes that the AHJ required. My permit required:
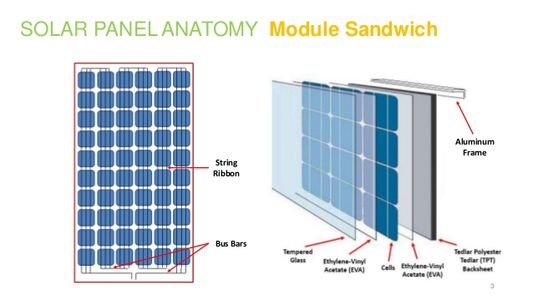
Panel specs (JA Solar JAP60-255/3BB)
Inverter specs (Sunny Boy 6000-tl-us)
A photo of my main supply panel and meter
A single-line drawing
A site-map with the layout of my panels and location of inverter
Engineering for the ground-mount system
A list of required labels (yes, there were tons of labels required)
One quick story - I had intended to mount the inverter in the garage. The AHJ told me I would need a rapid shutdown system. This is a button placed in a convenient spot for the firefighters to press if they are fighting a fire at your home. Once the button is pressed, there is no voltage on the PV wires so they can safely cut into the roof or walls. This was an added cost I had hoped to avoid. And everything I read about says it was intended for roof-mount systems, not ground-mount. The AHJ told me if I installed the inverter "in or on the house", it needed a rapid shutdown button. The solar guy told me I should mount the inverter on a couple of poles set next to my house. The AHJ agreed this would work. He was gone for a week, and when he returned, I received a phone call from him. I had included a drawing with the inverter mounting shown. He indicated he wasn't sure about the way I was mounting the inverter on the two poles. He told me he thought the best way would be to mount it to the house. This sure seemed like a contradiction to me. He is OK with the inverter mounted on the outside of the house but not inside the garage. At this point, I let the AHJ have the reins and told him that sounded like a great idea!
Step 6: Selecting a Ground-mount System
There are a couple of caveats I want to mention. I had planned on using a ground mount system that my solar guy had designed. It uses Unistrut for the structure and IronRidge racking for the panels. I knew I would need engineering completed. The AHJ stated in no uncertain terms that I could not use Unistrut. This material does not meet the UL2703 grounding standard for solar. Rather than arguing with him and getting on his bad side, I elected to go with a pre-engineered system. I ended up buying a system from Snap-n-rack. This cost ~$2400, where the Unistrut system would have been around $1000. Disappointing, but ultimately, the engineering for the Unirac system would have cost around $800. And the additional $600 only increases the payback by a few months. It came with documentation proving the engineering specs. The city requirements were to withstand 150 mph winds and a 43 psf snow load.
Most of the ground-mount systems out there had ridiculous requirements for the holes. One of them needed 10 holes, 7.5' deep and 24" in diameter. That would have required 5 yards of concrete! Some of them weren't designed for a 2 x 12 array. I liked the Snapnrack because the 12" diameter hole was much more reasonable. The back holes were 5.5' deep with the front holes only 3.5'. It also looked fairly simple to assemble. The online design tool shows the basic design (PDF attachment). It consists of vertical pipes set in concrete in 12" diameter holes. Pipe fittings are used to connect these to horizontal pipes that make up the beams. The rails are connected to the beams using straps. The panels then connect to the rails with clamps.
Attachments
Step 7: Trenching and Drilling Holes


I rented a trencher and an auger on a Saturday, thinking I could get both items completed. The auger was a one-man machine on wheels that was hydraulically powered. It was also a big pain. I would have been better off with a skid-mounted auger. What I thought was going to take an hour or two ended up being more than 5. And I was exhausted. But I plowed ahead and rented the trencher. That was a beast. It was very difficult to control. It had rained recently, and all of the shaded areas were wet which made the wheels slip. My trenches are not very straight as a result. I learned to trench halfway to 18 inches, then trench again the rest of the way. I finished after dark. I don't know if I have ever been more tired.
The city required an inspection of the trench and footings, which I passed with flying colors. It helped that they didn't look at the holes. It was rainy, making everything a mud mess. The building inspector checked my trench in several places to make sure it was over 18 inches deep and then went on his way.
Step 8: Concrete and Vertical Pipes


I purchased concrete from the local hardware stores and mixed by hand. It would have been nice to have a cement mixer and in hindsight, I should have bought one from Harbor Freight. It took more than a week to get all 12 pipes cut and set in hand-mixed concrete. Snapnrack design requires you to purchase 23' lengths of 1.5" galvanized pipe. I had to source that locally. I used a freeware program I found online to optimize the use of the pipe. Snapnrack overestimated the lengths, but I supposed that is better than under-estimating. I ended up with 2 extra lengths.
As you can see in the picture, the rear pipe is longer than the front pipe, and this determines the angle of the solar panels. I had planned to be able to manually tilt my array, but I lost this capability because I could not use the Unistrut design. I do hope to go back at some point and add the ability to tilt. But that is a project for another day.
Step 9: Conduit and Cable Sizing and Pulling


My next step was to run the wiring from the inverter mounting location to the array location. My inverter is a Sunny Boy, and they have a great online design tool. To limit my voltage loss and cost, it calculated that I needed to use 4 gauge aluminum wire. I bought 1800 feet of it but was given 2000 feet. I wish they had told me that. I pulled the wire from the house to the array one at a time. I was worried I wouldn't have enough and the first couple of wires were cutting it close. When I realized I had more, I left the last 3 much longer.
I then laid out the conduit. Conduit sizing rules stated that I needed 2" PVC conduit to fit my 5 wires - 1 ground and 4 conductors. I thought I might be able to slide the conduit down the wire and then glue the conduit together. But code requires the conduit to be glued together and then pull the cable. I have a beekeeping friend who is also an electrician. He supplied me with pull string, twine, and oxtail rope along with a "mouse" I sucked through with a shop vac. I used the mouse to pull the string to pull the twine to pull the rope to pull the cable. I divided my pull at roughly halfway, then had to glue one joint in the middle. I do think dividing the pull made it easier, but it took more time. I was fortunate (I guess) to have my two boys help me, as you can see in the picture.
Step 10: The Inverter


The inverter is where half the magic happens. The other half of the magic is the solar panel itself. The inverter takes the variable 300-600 V DC (depending on brightness of the sun) from the panels and converts it to 240 V AC. You can find many discussions about whether to use a string inverter or micro-inverters. My opinion is that micro-inverters are a superior technology, but they are also more expensive. With string inverters, the panels are connected in series, with each panel adding it's own voltage onto the total. This feeds into a single large inverter. With micro-inverters, one small inverter is connected to each panel, and these are connected in parallel. Rather than the voltage adding up, the current is added together, with each micro-inverter producing around 1A of current (depending on panel output).
For me, it made more sense to do a string inverter because:
1) The system losses are less with a higher voltage over the distances I am facing.
2) I was given a discount because the solar guy was closing out the older inverters right before the newer inverters were being released. There was no way I would have ever produced enough electricity to justify the higher cost of the micro-inverters.
The design of the system required two "strings" of 12 panels each. This means I have 2 separate circuits feeding into the inverter. That is why I needed 5 wires between the inverter and the array. 2 positive, 2 negative, and one ground. The above pictures show the color coded wires connected to the inverter.
The inverter also has a disconnect so I can turn the switch and disconnect the panels if maintenance is required on the inverter. This does leave a high voltage on the wires, so care must be taken to disconnect the circuit at the panels if maintenance is required on them or the 4 gauge aluminum wiring.
Code also required the use of a gel to prevent the oxidation of the aluminum. Copper wiring oxidizes, but oxidized copper still conducts electricity. Oxidized aluminum does not conduct electricity. Since this system will be in use for 30 or 40 years, it's best to prevent oxidation right from the start.
Step 11: Building the Snap-n-rack


Vertical pipes were cemented in the holes. Horizontal pipes were connected to vertical pipes with very slick pipe fittings. Support beams also connected with pipe fittings in enough places to meet the engineering requirements. Finished results are shown in the photos.
Step 12: A/C Circuit and Grid Tie-in


The AHJ required me to install a new sub-panel that is used as a solar combiner. It has 2 circuit breakers - a 20 A for the 4 roof panels and a 40 A for the ground-based panels. This then feeds to a new 50A breaker that was installed in my main service panel. I had a licensed electrician do this work. Because he was my brother-in-law, he didn't charge me anything. It took about 2 hours.
My main panel had multiple spaces, but the AHJ made sure I understood that the 50A breaker had to be installed in the top space, opposite the existing 200A breaker that feeds the panel in my house. The breaker spaces by the 200A breaker are rated for 200A total. The top space is on a separate bus and is rated for 50A. There is potential for damage and fire if the 50A breaker were not installed in the top space. Many homes would need an upgrade of the main service panel to support a solar installation.
I also needed to run conduit from the inverter to the new sub-panel, as shown in the picture. I installed all the conduit, then used a piece of tissue tied to a string as a "mouse" to pull the string, then the twine, and then the
THHN-2 cable. I pulled all 4 8 AWG conductors - 2 x hot, neutral, and ground - at the same time. The Sunny Boy design app specified 8 AWG conductors to keep total system voltage losses to less than 1%.
Step 13: Mounting Rails and Panels


The rails connected to the horizontal pipe beams with a pre-manufactured strap and rail nuts. The nuts snap into the bottom of the rail and a bolt goes through the strap into the nut. The nut actually bites into the rail, forming a grounding metal-to-metal bond. The rail has 2 straps - one on the high pipe, one on the low pipe.
At this point, I was ready to start mounting panels. The panels mount with the use of a C-clamp that slides into the top of the rail and once again bites into the rail to create a grounding bond. It tightens with a bolt. They also come with a nifty pre-fastened strap that is used to hold the clamp in place while tightening.
I did have a bit of bad luck with my order. The web design function had a bug for my specific configuration - 2 x 12 panels. It sent me rails that were too short. I was supposed to cut a single rail in half to end up with 2 rails. But I ended up with 1 1/2 rails. I discovered this over the Thanksgiving weekend. So I was only able to mount half the panels (as shown in the picture). It took over 2 weeks to finally receive replacement rails due to a lost shipment and a misunderstanding causing them to send me roof rails instead of ground rails. The nice 60 degree weather turned to snow and sub-freezing temperatures. Not a pleasant time.
Step 14: Grounding the Array

Grounding the array is an important step. Lightning does not have to strike the array directly in order to cause damage. Lightning in the area can induce voltages that can cause panels to fail. I purchased an 8 foot copper grounding rod and drove that into the ground under my array. I used a lug to connect a 4 AWG bare copper wire to the ground rod. I connect the bare copper to each of my panels using a small ground lug that fastens to the frame of the panel with a screw. In my particular setup, this is only required once for each column of panels. The rails are electrically bond together to the frames of the panels. So running one bare copper wire along the length of the array grounds the 2 panels in the column.
Step 15: "The PV Wiring Must Be Inaccessible"


I still don't quite get this whole idea. One of the requirements for my building permit was to make the PV wiring inaccessible. It seems like since this a standard requirement, a company like Snapnrack would have a nifty solution like their nifty c-clamp straps. But they don't. What I came up with was to use a "hardware cloth" from the local hardware store. It is a stiff metal mesh. With my first 12 panels installed, I could more clearly see what I needed to do. But I had to go back and remove the clamps I had already installed. I cut holes through the mesh where I needed to put the bolts through to connect with the rail nuts. I then bent and wired the top of the mesh to the panels, making it very difficult for someone (a child) to put their hands in and touch the PV wiring. Not that it really matters, because the wiring is insulated and would not electrocute someone unless they cut through the insulation. The connectors themselves snap together and only come apart by using a screwdriver inserted into a slot. So someone would have to be pretty determined to touch somewhere they weren't supposed to. The AHJ really emphasized this step, so I was worried about whether the building inspector would approve it. He had no problem at all. I also made a "cage" out of the hardware cloth to enclose the wiring that went into the junction box and tied to the 4 gauge aluminum wires going to my house.
Step 16: Final Inspection


I originally had my inspection schedule on the Monday after Thanksgiving weekend. The power company doesn't schedule the placement of their net meter until approval is received from the building inspector. I was hoping the inspector would give his approval to my roof panels and the 12 mounted panels. But my hopes were dashed. I was told he could only give final approval once the whole system was installed. On the morning of the day we were scheduled to fly to sunny Orlando on vacation, he inspected my system and gave me final approval! Once the power company was notified, it took about 2 1/2 weeks for them to install the net meter.
Step 17: Finished Product and Payback Time


These are a couple of pictures of the finished product from the front and back. The snow-covered mountains make a nice backdrop, eh? The neighbors who get the back view were pleasantly surprised and don't mind them. They were really OK with it when I told them some of the ground-mount systems would have been over 12 feet tall.
The project cost totaled $11,300. I will receive a $2000 tax credit from the state, and $3390 from the feds, making the final cost $5910. It is expected to produce about $1500 of electricity per year. Even at a conservative $1400, the simple payback is 4.2 years. If it does produce as expected, the payback will be 3.9 years.
My power company does a simple net meter. When my panels produce more than I use, the meter runs backwards. When I use more then my panels produce, it runs forward. My kwh production is subtracted from the khw used each month, and I pay for the difference. If I produce more than I use in a month, I bank the kwh's. In March, they reset the bank to zero. This makes it so there is no incentive to produce more than I use.
I know several people who have installed solar power systems. I question the economics some of them are getting. Paying $25k-$30k ($15-$18 after tax credits) for a system, without borrowing the money, will result in a ~12-15 year simple payback. If you borrow the money, it adds on another 3-5 years. I wonder how many of those people will still be in their home after 20 years. If you are considering such a system, dig into the numbers the salespeople are giving you and fight back with a healthy dose of skepticism. And a leased system makes no economic sense at all.
Not everyone is going to elect to install a system from the ground up like me. But you could act as your own general contractor and hire out the work to subs and save a lot of money. Then it might be worth it. Buying the panels and inverter from my solar guy helped out a lot too. His prices beat anything I could find online.
After more than 3 months of planning and hard work, I still think it was worth it to install my system.
Step 18: The Future of (my) Solar
I have the ability to add up to 10 or so more panels on my roof using the existing wiring. Why might I do this? My solar guy heats his house with electric space heaters in each room. He also drives a Chevy Volt. He heats his water with an electric heat pump water heater. Adding panels would enable me to do those things. But I can look at those kinds of things down the road. The first thing was to get the panels installed and working.
Another next step is a battery backup system. The Powerwall 2 looks promising, and there are a number of competitors to it that are potentially cheaper. I really like the idea of using less grid power and being more self-reliant. But one thing I have realized is that due to temperature inversions and extended stormy weather, I will never be able to go off-grid unless I install a generator. And with a generator, you are dealing with cost, fuel, and noise. On my worst day so far, I only produced 2 kWh. At a daily average usage of ~25 kWh, I would need over a hundred panels to be completely self-reliant.
In my state, there has been a lot of discussion as the power company has proposed additional fees for solar customers. The state legislature will most likely phase out the state tax credit. While this will hurt the solar industry, I question some of the tactics that are used to sell systems that have extended payback times. And I have a vested interest in a healthy grid, as I want the juice to flow when I flip the switch. But there must be balance, with new fees being fair and not excessive. I buy some philosophical arguments that the solar industry is propped up artificially by the government and that it wouldn't be viable without favorable government policy. But not enough that I didn't take advantage of the tax credits.
The other issue is that the power grid is designed to deliver electricity, not absorb it. In Hawaii, so many people did rooftop solar, that demand in the daytime went negative. And there are issues with base usage vs peak usage that are outlined really well in this article.
Step 19: Update - How Much Electricity Do I Make in a Day?


These are daily curves showing the output that my 6300 watts of panels make in a day. In April, which has the day when my panels produced the most, the output peaks at nearly 6000 watts. Not bad considering line losses. There are times on a cold sunny day when the output has hit 6150 watts, which is higher than the theoretical output when line losses are included. This is due to the temperature curve of the panels. The higher the temperature, the lower the panel output and vice versa. So on a cold sunny day, the output can exceed the rated output.
This can be seen in the output from July 15th. The peak output was about 4600 watts. It's interesting that on July 15th, the total output was 38 kWh. On April 15th, the total output was 45 kWh. My maximum in December 2017 was 29 kWh. The difference is the length of the days, the number of hours of sun. Even though the maximum output in July is less than December, the panels produce from about 8AM to 8PM. But in December, they only produce from 8:30 AM to 4:30 PM.
You can also see the effect of a cloudy day - on January 6, 2018, the peak output was only about 400 watts. They only made about 1.5 kWh that day.
I included the April 19th graph to show the effect of a partly cloudy day.
I was hoping that one day I might be able to add storage capability and eventually go off-grid. I have realized that will not happen. There are too many cloudy days in the winter when the system produces less than 1 kwh. Sometimes this happens for a week. There is no way I could install enough panels or battery capacity to get through that. I will always need to have a secondary source of electricity, whether that is the grid or a generator.
One enhancement I would like to make: I could boost the daily output by devising a method to tilt the panels. I was thinking of doing a sleeve over the existing rear vertical pipes with holes and pins to hold them in place. The other option might be some kind of jack welded on to the vertical pipes. The tilt angle would be manually changed several times a year, ranging from 60 degrees in the winter to about 5 degrees in summer. Whatever I do has got to be able to withstand the 110+ mph winds we received in 2011 from the canyon. That is a project for the future sometime.
Step 20: How Much Electricity Do I Produce in a Month, or in a Year?


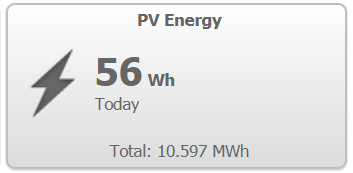
In my first year, this system has made roughly 11 MegaWatt-hours. Note - I didn't get the monitoring system installed and working until mid-February. But I made roughly 500 kWh in February 2017. So add 10.597 MWh to 500 kWh and that is my rough total for a year. This is pretty close to my original estimate. It totals between $1400-$1500. In November and December, and again in July, August, and September, I used more than I produced. But I still only paid 8.8 cents per kWh. Before I was paying 11.5 cents for anything over 400 kWh in a month, and 14.5 cents for usage over 1000 kWh. So the system kept me in the bottom tier of charges.
It is interesting to compare my best month and worst month. In November 2017, there were 5 days under 5 kWh, and 13 days over 20 kWh. There were lots of cloudy days. Even the 20+ kWh days had periods of cloudiness. But in July, there were no days under 20kWh and 22 days over 35 kWh. Even the the sub-20kWh days were mostly sunny. The number of sunny vs cloudy days has the biggest impact on production month-to-month.
I have included the 2017 yearly chart as well.

First Prize in the
Epilog Contest 8

Grand Prize in the
Green Electronics Contest 2016

Participated in the
Remix Contest 2016


