

Introduction: 5 Simple Ways to Determine LED Polarity


LEDs are probably the most-liked elements by all beginners maybe even by everyone involved in electronics projects. One of the most important factor to use them properly is to connect them the way they should. Of course, usually you need to use a resistor in order to limit the current and avoid burning your LED, but that's not what I am going to write about in this instructable. I want to talk about even more basic thing: checking the LED polarity. In electronics you can find various components, we can divide them into polarized ones (LEDs, electrolytic capacitors, transistors, microcontrollers and many others) and ones that don't have polarity (resistors, coils and other). Polarized component means that it has to be connected in a specific way in order to work. Connecting it the other way may damage it, it may even explode (electrolytic capacitors) or your circuit will just not work properly. So polarity is very important as you can see. In this instructable, I will show you 5 ways to determine LED polarity. Let's start!
Step 1: There Is a Reason Why Those Are Different

Leads length. That's the easiest way to check LED polarity, at least if you have brand new LEDs. If you already used them in a project or unsoldered them from an old device this wouldn't work for you but no worries I have other 4 methods that may work for you :)
As you can see on the image above leads of an LED have different length and that's not a manufacturing error, it's done on purpose. It's the easiest way to determine where is a plus and minus of an LED. The longer lead is a positive one and shorter lead is a negative one. In case you cut out part of leads it wouldn't work for you, if you are not sure if you did, follow the next steps to be sure that you determined polarity right.
Step 2: #2 Nothing Is Exactly the Same on Both Sides

And so the sides of LEDs aren't. If you will take a closer look at the LED you will notice that one side of it is flat and again that's not a manufacturing error, that's a mark that lets you easily determine LED's polarity.
Lead next to this mark is negative another one is positive.
This method is probably the best, it's super easy, always work and you don't need any gear to check that. It's almost impossible to destroy this mark, maybe if you would sand down the other side of LED, but why? I don't know :)
Step 3: #3 Small Things Matter, Take a Closer Look...
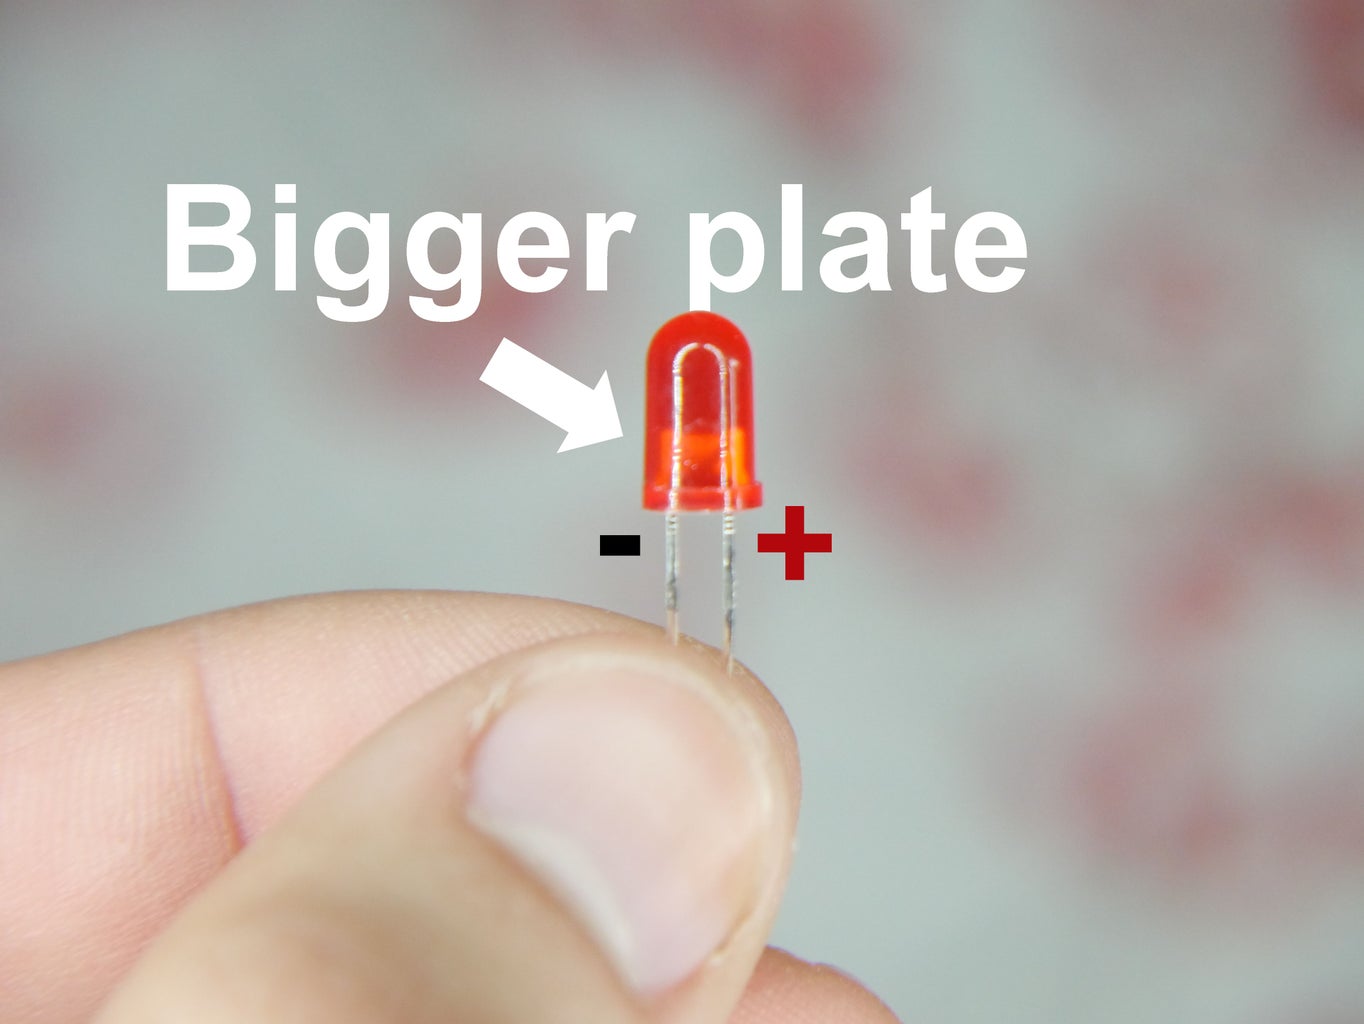
Sometimes it's worth to take a closer look at small details, those can tell you a lot, you just have to know where to look. Here is a tip: look at the inside of an LED. Do you see those two metal plates inside a plastic part that depends on what type of LED you have can be clear, red, blue, yellow or green? As you may notice they are not the same when it comes to the size. One is smaller and another one is bigger. The bigger plate is always connected to the negative lead and smaller one to positive lead. Still a very simple method, just have to look closely and maybe in some cases you will need a magnifier for that.
As throbscottle and studleylee pointed out in the comments, there are some LEDs that are built differently, and this method wouldn't work with them. Bigger plate inside them may be connected to the positive lead. Those are very rare so there is a small chance you will find some of them, just wanted to make it clear that this method may not always work.
Step 4: #4 Multimeter Will Help Because It's Multi


The multimeter is super useful in electronics and if you don't have one yet, you should definitely get one. It can measure a whole bunch of values and save you a lot of time on troubleshooting and trying to find a resistor value. Most of the multimeters (even cheaper ones) have a function of measuring diodes (this kind of diodes that don't shine) and we can use this function to check the polarity of an LED. Just touch leads with probes if it don't shine swap the probes and it should be fine. The positive lead is where you red probe touches an LED and negative lead is where you have a black probe. This method is fast and easy but you need a multimeter for that, you may not have a multimeter in your pocket (I always have one with me, except when I am at the swimming pool, because I don't have pockets in my swimming trunks) all the time and that's why the first 3 options are better.
Step 5: Sometimes Smaller Is Better - a Coin Cell Battery


Small coin cells batteries are mainly used in watches, but we may also it to determine the polarity of an LED. Why a coin cell battery? Because it is small enough to fit it in between leads of an LED. You can also use a bigger battery let's say an AA battery but you will need some cables to connect it to the LED. If LED lights up after placing a battery between LED leads the positive lead of LED is where it touches a plus of a battery if it doesn't shine, swap the battery polarity and it should shine. This method would be great but coin cell batteries are not that popular so it's not the most practical method.
Step 6: Conlusion

There you have it, 5 simple methods to find LED polarity. I hope you will find them useful for your next electronics project! If you have any other LEDs related tips, share them in the comments! Thank you for reading :)
Happy making!

Second Prize in the
Electronics Tips & Tricks Challenge


