

Introduction: Arduino Alternative - STM32 Blue Pill Programming Via USB


You and I both love Arduino boards, from the smallest Attiny85, to the biggest MEGA2560. However if you need more speed, more analog inputs, more precision, but still don't want to switch from Arduino programming, there's a elegant solution....The blue pill!
If you haven't heard there's an Arduino nano like board, nicknamed the blue pill. Would you care to guess it's colour?
The best thing (apart from it's amazing speed and overall performance) is the ability to program it with the Arduino IDE, essentially making it an Arduino.
You'll say it sounds too good to be true and it kind of is. There is a catch. The boards can't be programmed over USB, since they don't come with a bootloader. (A bootloader is basically Windows for microcontrollers, it doesn't do anything, but you still need it to run stuff)
In this instructible I'll show you where to get the boards, how to program them and FIX the no USB connection problem so you can program it exactly like an Arduino, using just a USB serial connection.
Step 1: What You'll Need:


First you'll need the board itself. I recommend you buy them here:
https://www.ebay.com/itm/192674786885
You'll also need a USB to TTL programmer which you will only need to program the board the first time, but it's also usefull for other projects so you might as well own one...you can get it here:
https://www.ebay.com/itm/401604236499
Some wires or jumper cables are also usefull, but I'll assume you have those on hand. If not, improvise.
Step 2: Arduino IDE


Before you can start programming the blue pill in the Arduino IDE. you'll need to add a few things. Don't worry, this is quite easy.
First open the Arduino IDE. Go to File->Prefferences...a new window will open
At the bottom there's a line saying "Additional Boards Manager URLs:"...at the end of the line, there's an icon of two windows open, click that.
Yet another window will open and there you have to write
http://dan.drown.org/stm32duino/package_STM32duino_index.json
If you already have something in the window, just go into a new line. Then click OK and close Arduino IDE.
See, the hard part is done.
Now you should open the IDE again and go to Tools->boards->Boards Manager (it's the very first thing on the list)
A new window will open and where it says "Filter your search..." you should type in stm32f1
There should only be one result. Click install (lower right corner) and wait for it to install. When that finishes, close the IDE again.
There you're all done with the IDE part.
Step 3: Drivers


Since windows doesn't properly recognise the board, you should manually install the drivers. This too it just a "drag and drop" process so don't worry, I'm sure you can handle it.
First, download the drivers here:
https://github.com/rogerclarkmelbourne/Arduino_STM32
You do this by clicking the green button that says "Clone or Download" then selecting Download ZIP.
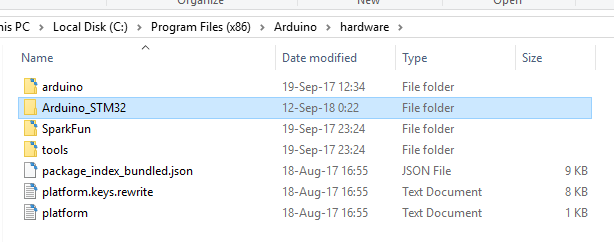
Once you've done that, open the zip file. Keep it open and go to where ever your Arduino installation folder is. It's usually C:\Program files(x86)\Arduino
Once there, open the hardware folder...you should have one, but if not, just make one.
Once you're in the hardware folder, drag the "Arduino_STM32-master" from the ZIP to the hardware folder. Rename it to Arduino_STM32 (just delete the master part)
Now open the Arduino_STM32 folder...there is a folder inside that's named drivers. Somewhere in that folder you'll find a file named install_drivers (it's a batch file). Click on that and install the drivers. Just say yes to everything.
Congratulations, you're basically done...well, almost.
Step 4: Burning the Bootloader


Remember that "windows" thingy that needs to be on the board in order for you to use the USB, well, we have to put it on the board now. It's called a bootloader, but the name doesn't really matter.
In order to do this, you'll need two things. Download both here:
https://www.st.com/en/development-tools/flasher-stm32.html
This is a program that you use to install the bootloader. (bottom of the page) You need to register to the page and then you get to download it.
You also need to download the bootloader itself. You can get that here:
https://github.com/rogerclarkmelbourne/STM32duino-bootloader/tree/master/binaries
Download "generic_boot_pc13.bit"
Now that you have everything you need to start, it's time to connect everything up and burn the bootloader.
Plug your USB-TTL adapter into a USB port.
Make these connctions
USB-TTL........blue pill
TX.........A10
RX.........A9
3.3V.......3.3V
GND.......GND
On your blue pill, the top most jumper has to be on the right side. (see picture)
Now open the software you just downloaded. Install it (just click next next next) and then open it.
It should recognise your device and list a COM port. If it doesn't check if you missed a stip or if your connections are ok. Also run the software again so it resets.
Once you have a COM port recognised, you can click Next 3 times, then you'll come to a window where it's possible to select "Download to device"...select it and where it says "Download from file", click the ... icon and find your bootloader. Select it, click ok and again click Next. This will install your bootloader. You can close the program now, but DO NOT disconnect the board yet!
First make sure to put the top most jumper on the board back to the left side, so both of them are on the 0 position. Now you can disconnect everything.
Step 5: First Programming


Open your Arduino IDE. Go to tools and where it says "Boards", select "Generic STM32F103C series"
Select the upload method as STM32duino bootloader
Select the Port to be "COMX (Maple Mini)"....the X is what ever your port number is.
Your blue pill just became a Maple Mini. Again, don't forget the jumpers as shown on the picture.
You're good to go. For your first program you don't need to upload anything fancy, you can just upload a blank sketch with a setup and loop funcion, but I like to make a Serial.print program, since that's way more satisfying. My program is attached below. It's a txt file, so just copy it into you Arduino IDE if you wish to use it.
The IDE might report an error, buf will still upload the program, so you
can just ignore it. If you still run into problems, try putting the lower of the two jumpers to the right position.
With all that done, congratulations! You now can use the blue pill as an Arduino!
If you enjoyed this Instructable, consider visiting my Fundrazr page here. And of course, share.


