

Introduction: Chess Robot Made With LEGO and Raspberry Pi

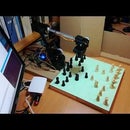
Amaze your friends with this chess robot!
It's not too difficult to build if you have made LEGO robots before and if you have at least an elementary knowledge of computer programming and Linux.
The robot makes its own moves, and uses visual recognition to determine the human player's move.
One of the novel things in this robot is the code for move recognition. This vision code is also usable for chess robots built in many other ways (such as my ChessRobot using Lynxmotion robotic arm).
No special chess board, reed switches or whatever are required (as the human's move is determined by visual recognition).
My code is available for personal use.
Step 1: Requirements

All the code is written in Python, which will run on, amongst other things, a Raspberry Pi.
Raspberry Pi is a credit-card-sized computer that can be plugged into a screen and a keyboard. It is an inexpensive (around $40), capable little computer which can be used in electronics projects and robotics, and for many of the things that your desktop PC does.
My robot uses a Raspberry Pi, and Lego. The hardware interface between the RPi and the Lego Mindstorms EV3 motors and sensors is provided by BrickPi3 from Dexter Industries.
The Lego build is based on "Charlie the Chess Robot", by Darrous Hadi, modified by me, including mods to use an RPi, rather than the Lego Mindstorms processor. Lego Mindstorms EV3 motors and sensors are used.
You will also need a table, a camera, lighting, a keyboard, screen and pointing device (e.g. mouse).
And of course, chess pieces and a board.
I describe all these things in more detail in the subsequent steps.
Step 2: The Hardware Build

As I previously indicated, the heart of the vision code will work with a variety of builds.
I based my robot on "Charlie the Chess Robot" (EV3 version) by Darrous Hadi, info on that page says how to get the build instructions. The parts list is here.
I modified the robot in a couple of ways.
1. The grabber. This did not work for me. The gears slipped, so I added additional Lego pieces to prevent that. And then when the crane was lowered it would often jam, so I added a Watt's linkage to prevent that.
Above is the grabber in action, showing the modified linkage.
2. The original build uses the Lego Mindstorms EV3 processor, but I use a Raspberry Pi, which makes it easy to use Python.
3. I use a Raspberry Pi 3 Model B.
4. In order to interface the RPi to the Lego, I use BrickPi3 from Dexter Industries. The BrickPi attaches to the Raspberry Pi and together they replace the LEGO Mindstorms NXT or EV3 Brick.
When you have the Lego Digital Designer file, then there is the question of getting the LEGO pieces. You can get bricks direct from the LEGO shop, and this is the cheapest way to obtain them. However, they will not have everything you need, and the bricks may take a couple of weeks or more to arrive.
You can also use Rebrickable: open an account, upload the LDD file and from that get a list of sellers.
Another good source is Bricklink.
Step 3: The Software Which Makes the Robot Move
All the code is written in Python 2.
- Dexter Industries supplies code to support moving the EV3 motors, etc. This comes with the BrickPi3.
- I provide the code to make the motors move in such a way as to move the chess pieces!
- The chess engine is Stockfish - which can beat any human! "Stockfish is one of the strongest chess engines in the world. It is also much stronger than the best human chess grandmasters."
- The code to drive the chess engine, validate that a move is valid, and so forth is ChessBoard.py
- I use some code from http://chess.fortherapy.co.uk to interface with that.
- My code (in 2 above) then interfaces with that!
Step 4: The Software for Recognising the Human's Move
After the player has made their move, the camera takes a photo. The code crops and rotates this so that the chessboard exactly fits the subsequent image.
The chessboard squares need to look square!. There is distortion in the image because the edges of the board are further away from the camera than the centre of the board is. However, the camera is far enough away so that, after cropping, this distortion is not significant. Because the robot knows where all the pieces are after the computer move, then all that has to be done after the human makes a move is for the code to be able to tell the difference between the following three cases:
- An empty square
- A black piece of any kind
- A white piece of any kind.
This covers all cases, including castling and en passant.
The robot checks that the human's move is correct, and informs them if it isn't! The only case not covered is where the human player promotes a pawn into a non-queen. The player has then to tell the robot what the promoted piece is.
We can now consider the image in terms of chessboard squares.
On the initial board set-up we know where all the white and black pieces are and where the empty squares are.
Empty squares have much less variation in colour than have occupied squares. We compute the standard deviation for each of the three RGB colours for each square across all its pixels (other than those near the borders of the square). The maximum standard deviation for any empty square is much less than the minimum standard deviation for any occupied square, and this allows us, after a subsequent player move, to determine which squares are empty.
Having determined the threshold value for empty versus occupied squares, we now need to determine the piece colour for occupied squares:
On the initial board we calculate for each white square, for each of R, G, B, the mean (average) value of its pixels (other than those near the borders of the square). The minimum of these means for any white square is greater than the maximum of the means across any black square, and so we can determine the piece colour for occupied squares. As stated previously, this is all we need to do in order to determine what the human player's move was.
The algorithms work best if the chessboard has a colour that is a long way from the colour of the pieces! In my robot, the pieces are off-white and brown, and the chess board is hand-made in card, and is a light green with little difference between the "black" and "white" squares.
Edit 17 Oct 2018: I have now painted the brown pieces matt black, which makes the algorithm work under more variable lighting conditions.
Step 5: Lights, Camera, Action!

Lights
You need an even source of light placed over the board. I use this one, which is really cheap, from amazon.co.uk - and no doubt there is something similar on amazon.com. With the room lights switched off.
Update: I now have two lights, to give a more even source of light
Camera
No doubt you can use the special Raspberry Pi camera module (with a long cable), but I use a USB camera - "Logitech 960-001064 C525 HD Webcam - Black" - which works with the RPi. You need to ensure that the camera does not move with respect to the board, by building a tower or having somewhere to fix it firmly. The camera needs to be fairly high above the board, in order to reduce geometric distortion. I have my camera 58 cm above the board.
Update: I now prefer the HP Webcam HD 2300, as I find it to be more reliable.
Table
You need a sturdy one. I bought this one. On top of that you can see I have a square of MDF, with some stuff to stop the robot jumping around when the trolley moves. It's a good idea to keep the camera in the same position over the board!
Keyboard
The RPi needs a USB keyboard for its first setup. And I use that for developing the code. The only thing the robot needs a keyboard for is to start the program and to simulate hitting the chess clock. I got one of these. But really, you only need a mouse or a button GPIO-connected to the RPi
Display
I use a big screen for development, but the only things the robot needs is to tell you your move is invalid, check, etc. I got one of these, also available at amazon.com.
But rather than requiring a display, the robot will speak these phrases! I have done this by converting text to speech using code as described here, and attaching a small speaker. (I use a "Hamburger mini speaker").
Phrases the robot says:
- Check!
- Checkmate
- Invalid move
- You won!
- Stalemate
- Draw by threefold repetition
- Draw by 50 moves rule
The fifty-move rule in chess states that a player can claim a draw if no capture has been made and no pawn has been moved in the last fifty moves (for this purpose a "move" consists of a player completing their turn followed by the opponent completing their turn).
You can hear the robot speaking in the short "fool's mate" video above (if you turn your sound up quite high)!
Step 6: How to Get the Software
1. Stockfish
If you run Raspbian on your RPi you can use the Stockfish 7 engine - it's free. Just run:
sudo apt-get install stockfish
2. ChessBoard.py
Get this here.
3. Code based on http://chess.fortherapy.co.uk/home/a-wooden-chess...
Comes with my code.
4. Python drivers for BrickPi3:
Get these here.
5. My code which invokes all the code above and which gets the robot to make the moves, and my vision code.
Get this from me by posting a comment, and I will respond.


