

Introduction: Ultimate DeWalt Scroll Saw Maintenance & Repair Guide


1.5 years! That's the average lifespan of the DeWalt 788 Scroll Saw... which is approximately 3120 total running hours. You'll hit that limit if you use the saw 8 hours a day, 5 days a week.
What goes wrong? The bearings become damaged because the grease used by the bearing vendor is low quality. It's speculated that DeWalt wants to keep the cost of the saw low and profits high and that is why DeWalt does not address this issue. Well... YOU CAN! It's a lot easier than you might think!
Is your saw making excessive noise? Guess what... that noise will NOT go away and the problem WILL get worse... guaranteed! Also, it's almost impossible to tell what's causing the noise without taking the saw apart because noise inside the enclosure bounces around the metal case. It just appears to come from everywhere.
Missing parts? If your saw was ever opened by a previous owner (or even yourself) some critical parts may have silently fallen out and gone missing without being noticed! My used saw was missing 2 items and that's the reason I made this Instructable.
Fix design flaws! Finally, there are two modifications that should be done to every saw... even brand new saws! Calling these "design flaws" is admittedly not a fair term to use but you will definitely enjoy these modifications.
Step 1: Materials, Tools & Replacement Parts


Material List
- Valvoline SynPower Synthetic Grease https://amzn.to/2FciaLh
- Loctite Threadlocker (Blue) https://amzn.to/2CP4nsg
- Waterproof Grease (A080360A) https://amzn.to/2SEs7oz
- (optional) CA Glue https://amzn.to/2GZiKOQ
- (optional) Double-Sided Tape https://amzn.to/2FfFaJ4
Tool List
- Ratchet with 13mm, 10mm, 8mm & 7mm sockets https://amzn.to/2Vw8ocx
- Small 7mm wench (the 7mm socket above won't work... needs to reach into a small area)
- Torx bits: T20, T25 & T27 https://amzn.to/2GUJP5G
- Allen Key: M5 https://amzn.to/2LTsmJU
- Wrench 3/4" (or an adjustable wrench)
- Flathead screwdriver
- Clamp https://amzn.to/2Vxiie4
- Sandpaper or a belt sander (No shown) (to grind down a small metal part)
- (optional) Needle nose pliers (just to hold small objects)
- (optional) Box cutter (just to lightly pry up parts that are stuck by grease)
- (optional) Small wire brush (just to clean parts... hey... who doesn't like clean tools?)
- (optional) Towel (to stop small parts from landing on your shop floor and vanishing forever!)
- (optional) Pan Galactic Gargle Blaster (this is worthless... why is it even on this list?)
- (optional) Cordless drill for the Torx bits https://amzn.to/2C1wuTE (not shown) (there are lots of screws)
- (optional) Arbor Press https://amzn.to/2C6MEef (not shown) (only if you need to replace bearings. A drill press may also suffice)
Replacement Parts from DeWalt (if your saw has damaged or missing parts)
- All parts except the needle bearing: https://servicenet.dewalt.com/Products/Detail/DW788
- Note: The red fully contained bearing on the motor shaft must be purchased with the Rocker Arm Assembly Rod (DeWalt Part number 286280-00)
Replacement Parts from VXB.com(if your saw has damaged Needle Bearings)
- Shell Type Needle Roller Bearing 8x12x10 (Part number: HK0810) (quantity 3)
- Shell Type Needle Roller Bearing 6x10x9 (Part number: HK0609) (quantity 10)
- Shell Type Needle Roller Bearing 14x20x12 (Part number: HK1412) (quantity 2)
All links are affiliate links... which mean you'll pay the same price for the item and I'll get a few pennies... thank you!
Step 2: Remove Table


Removing the heavy table will make the saw MUCH easier to work on.
Unscrew and remove the Trunnion Knob.
Remove the Trunnion Knob Washer (don't let this hit the floor!)
Gently tug the Table toward the front of the saw. This will release it from the mounting pin. Continue moving the table about 3 inches in this forward direction until the trunnion clears the bolt. Then place the Table aside.
Step 3: Lubricate Rubber Parts


Unscrew and remove both the upper and lower Blade Clamp Knobs.
Pull the plunger straight out.
Lubricate the plunger with non-petroleum based waterproof lubricant. Petroleum will eat away and destroy the rubber parts. Do NOT use Vaseline!
Lubricate the Table Mounting Pin with the same lubricant.
Step 4: Remove Left Lower Arm Cover
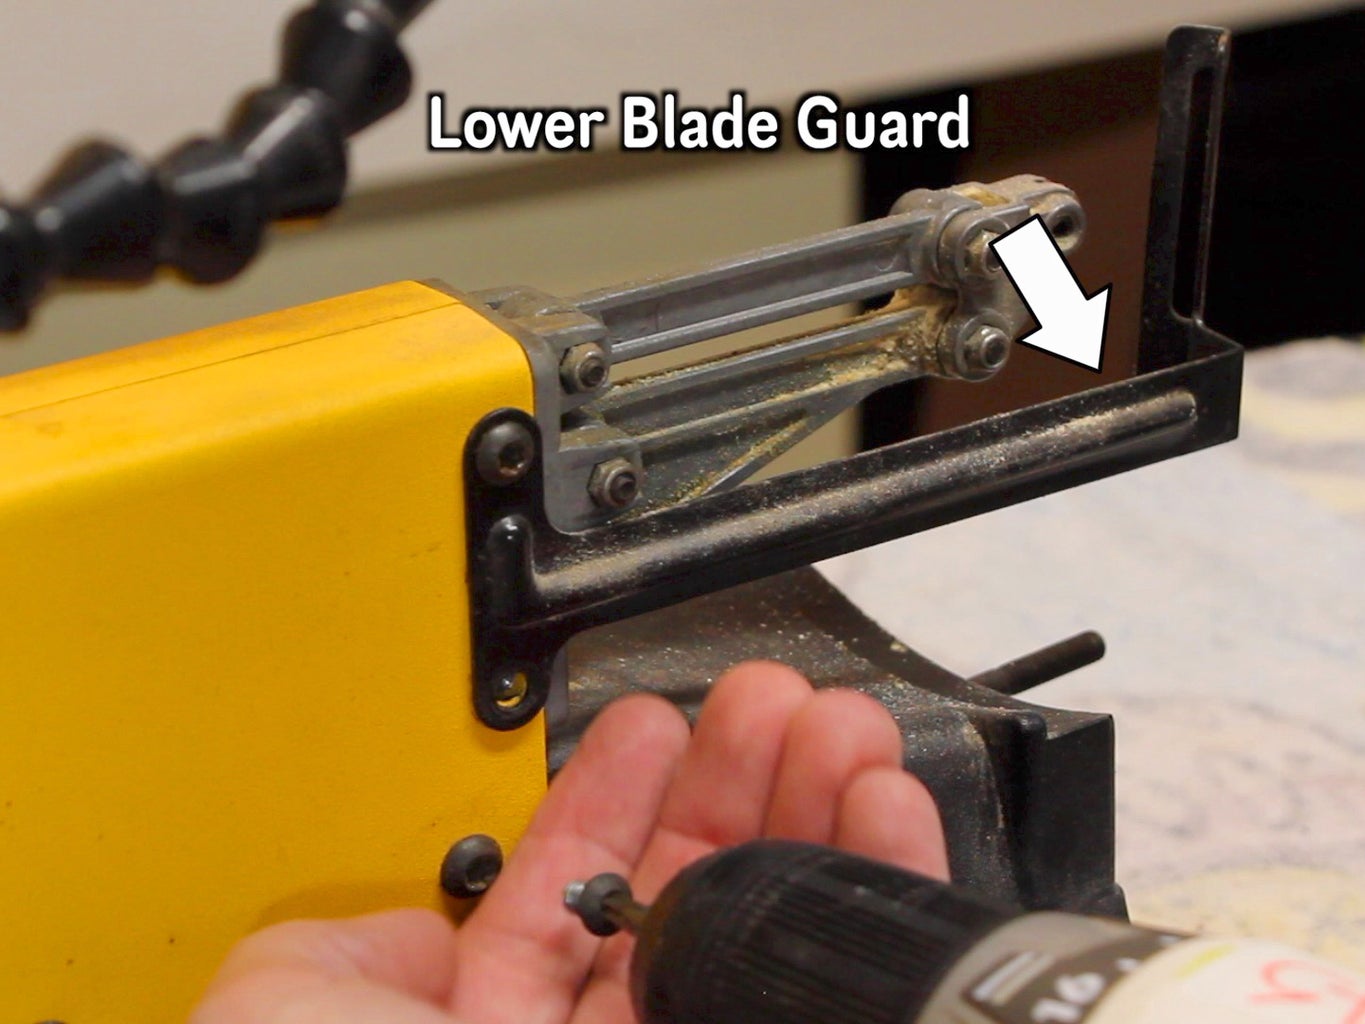


Use a Torx 25 bit to remove the Lower Blade Guard screws and the Lower Blade Guard.
Capture the 10mm nuts with a ratchet while using a Torx 27 bit to remove 4 screws on the Left Lower Arm Cover.
Remove the Left Lower Arm Cover.
Reinstall one bold and screw through the base and the Right Lower Arm Cover that has not been removed. This will keep the saw stable throughout the remaining operations.
Step 5: Remove Left Housing


Using a Torx 27 bit, remove 5 screws in the Left Housing. (the two screws that are very close together can remain... their only function is to hold the optional lamp accessory)
Use a straight screwdriver between the Upper Arm and the Left Housing to pry the case partially open.
Hold the upper arm in place and pull the cover straight off. Important! Do NOT let the upper arm fall off!
Important! There is a wavy washer on the large Pivot Rod located in the center of the Main Rocker Assembly. This wavy washer will likely fall off and hit the floor without you knowing it. This item is very important and helps keep noise to a minimum and reduces stress.
There is also a steel plate (indicated by the arrow on the photo). It will likely fall out as well. If that happens it's not a big deal... just pick it up and place it back if that happens.
Check for metal fillings or metal dust inside the saw, especially below the circuit board. If this exists, the bearings are likely damaged.
Step 6: Remove Rocker Assembly


Use a 7mm wrench and a Torx 25 bit to review the two nuts and screws attached to the Main Rocker Assembly. These are located at the front of the saw.
Turn the Counter Weight on the motor shaft to the 10 o'clock position and capture it with a 3/4" wrench.
Read the next sentence AND the warning below it!
Use a 13mm socket on the shaft screw and LOOSEN CLOCKWISE because this bolt has left-hand thread!
Warning!If you damage the shaft by attempting to loosen this nut in the normal counterclockwise direction, you will be forced to purchase a new $260 motor! For the love of all that's holy, loosen this nut clockwise... please!
Hold the upper arm and move the upper arm slightly away from the case. This will give you enough room to remove to pull the entire Main Rocker Assembly straight out. Go slow and easy... it will come out.
Step 7: Free the Lower Front Rocker Assembly

This step is easy. Only two Torx 25 screws need to be removed to free the Lower Front Rocker Assembly.
Note: These two screws have washers, presumably to not chip the paint on the yellow Right Lower Arm Cover.
Simply pull the Lower Front Rocker Assembly away.
Step 8: Lubricate the Bearings in the Lower Front Rocker Assembly


This process must be done on all bearings located in the:
- Lower Front Rocker Assembly (holds the blade below the table)
- Upper Front Rocker Assembly (holds the blade above the table)
- Rocker Assembly (attaches to the motor shaft and both items listed above)
Remove the Hardened Steel Sleeve from the bearing. Note: They may just fall out. Clean them.
Inspect the Hardened Steel Sleeve. It should be smooth with no dents. If there are dents that means it's damaged and will need to be replaced. Links to purchase replacement bearings appear at the beginning of this Instructable.
Clean the needles inside the Needle Bearings. I use pipe-cleaners, cue tips, and fabric wrapped around cue tips... it all works.
Use a cue-tip or pipe-cleaner and scrub generous amounts of Synthetic Grease into the bearings. Really coat those needles well. More is better.
Reinsert the Hardened Steel Sleeve.
Again, do this process in future steps.
Step 9: Replace Bearings (if Needed)

Skip this step unless you need to replace a defective bearing.
Purchase new bearings using the link at the beginning of this Instructable.
Place the Rocker Assembly Part on the press that contains the defective bearing.
Place a new bearing directly on top of the defective bearing.
Use the press to force the old defective bearing out while simultaneously adding the new bearing in its place.
Step 10: Lubricate the Bearings in the Main Rocker Assembly


Use M7 and M8 sockets and use Torx T25 and T27 bits to expose, clean, and lubricate all of the bearings in the Main Rocker Assembly. Use the same process as described earlier in this Instructable.
The large center bearing is actually two bearings. This area takes the most punishment under normal use. Lubricate is good. Real good!
Use Theadlocker on the nut that holds the Connecting Rod to the Main Rocker Assembly.
Step 11: Free the Tension Knob


Use a Torx 25 bit to remove the 4 screws on the plastic Electronics Housing.
Lift the Electronics Housing up and let it hang next to the upper arm. Note: I disconnected mine in the photos but this is not necessary.
Use an M5 Allen Key to review the M8 Screw and the Wavy Washer. This Wavy Washer seems insignificant... but it's a critical component of this scroll saw. Don't lose it.
Remove the Tension Knob and the metal Sleeve.
Step 12: Free the Upper Front Rocker Assembly


Remove the two Torx 25 screws on the upper arm and pull the Upper Front Rocker Assembly away.
Use a Torx 20 bit to remove the 4 screws on the Lid of the Upper Front Rocker Assembly.
Grind off the lower part of the Lid. Grind it at an angle taking more off the end and less off the middle. This will not damage or hurt your saw in any way. In fact, it will make your saw much quieter!
Quiet = Good.
Not shown: Clean, inspect, and lubricate the bearing in the Upper Front Rocker Assembly by using the same steps defined earlier in this Instructable.
Step 13: Glue the Trunnion Knob Screw to the Base


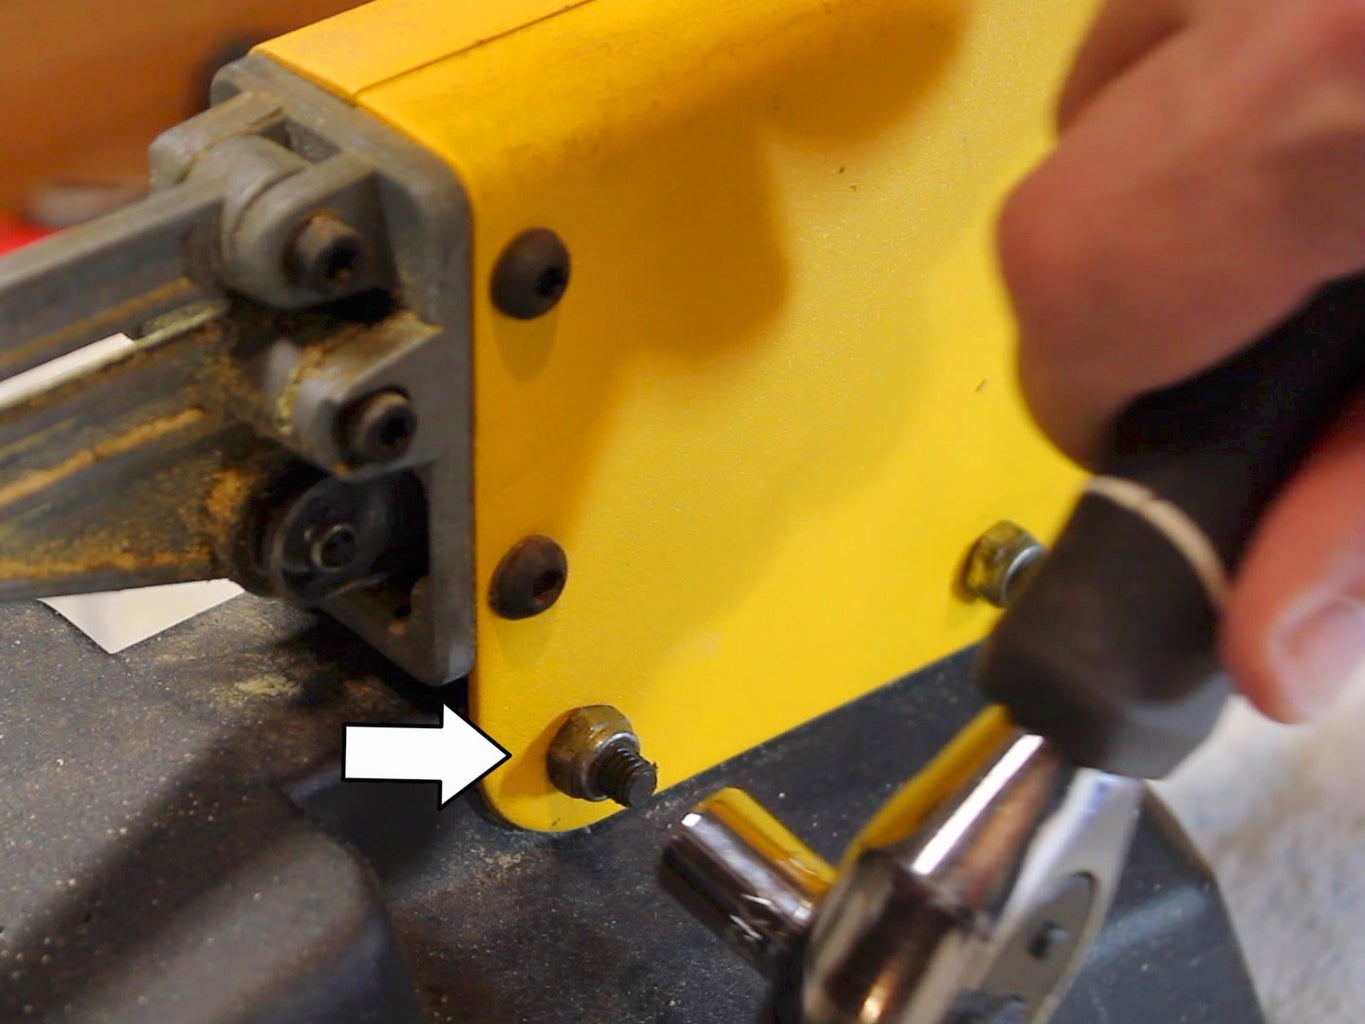
Remove the single screw between the Right Lower Arm Cover and the Base to free the Base. Let the saw gently tip downward just a bit so it rests on the table.
Flip the Base over and add a dab of CA Glue to the screw. Make sure the screw is between the two vertical barriers.
Why is this needed? Sometimes this screw can work move away from those two vertical barriers if you loosen the Trunnion Knob too much. Thankfully, this doesn't typically during normal use but it almost always happens when you take the Trunnion Knob completely off... which you just did earlier when you removed the table. This screw can sometimes fail to seat itself properly. This screw is never visible inside this Base and this can be frustrating. This technique will make sure this slippage doesn't happen. It's a small thing... but nice.
Step 14: Reassemble and Add Treadlocker to the Motor Shaft


Follow the steps in reverse to reassemble your saw!
Yes... I painted my saw red. Don't hate me for that... hey, I like red. It's so... Rock-N-Roll! Am I right?
Add a bit of grease to the Tension Wedge at the back of the Upper Arm. This Tension Wedge scrapes across the upper plate and that motion lifts the Upper Arm which tightens the blade. When metal touches metal... there should be grease!
Remember: Do not let the Upper Arm fall when the Main Rocker Assembly is inside it! Use the clamp to secure it.
Use Treadlocker on the motor shaft before adding the washer and the left-hand threaded bolt back on. Tighten = Counterclockwise.
Remember: Ensure the wavy washer is on the large hardened steal Pivot Rod. This wavy washer seems insignificant... but it helps keep your saw quiet and reduces a lot of unnecessary stress on the Main Rocker Assembly.
Reassemble the metal case and reattached the Table.
Optional: Add double-sided tape between the Trunnion Knob and the Trunnion Knob Washer. This may keep the washer from falling to the floor if you completely remove the Knob in the future.
Step 15: You're Done!

Oh my... you're done! See... I told you it wasn't too hard.
Enjoy trouble-free operation from your saw for years to come... at least 10-years!
Fun story: I bought my saw used... it was missing the wavy washer and the Trunnion Knob Washer. The table would not stay in place and it was noisy because the missing wavy washer couldn't keep the Main Rocker Assembly nice and snug. I'm sure my saw would have been ruined after a short time. Now, it will last forever... or close to it. Frankly, I would much rather have the saw that I serviced than a brand new saw. No joke.


