

Introduction: Waterbot: Arduino Robot Boat


The Waterbot is a robotics arduino boat. He can be programmed from scratch using arduino tools or just built and contolled using the LittleBots app. It is currently Live on Kickstarter.
At Slant, for the past two years, we have been developing and manufacturing 3D printed arduino robotics kits. Up to this point we have created 5
When we started on the 6th bot, we knew that we wanted to go where no robot had gone before. So we chose water. No one in the entire Arduino community had created a robotics kit for the pool or the puddle. We fixed that.
Now STEM students and hobbyists have a programmable arduino platform for exploring small ponds or just being creative in the water. You can use this kit to learn basic robotics, flotation, hydrodynamics, electronics, and programming.
But we still have some final development to do. You can support the Waterbot on Kickstarter. You can also visit the LittleBots website for other tutorials and great robots and parts.
Follow Slant Concepts on Facebook to get updates on new projects.
Step 1: Parts

Step 2: Insert Servos

Insert the Servo into the slots of each side
Make sure that the armature of the servo is down and forward in the slot and the lead is going through into the electronics compartment on the main body.
Step 3: Connect Paddle Wheels


- Insert the two prong servo horn into the slot in the paddle wheel.
- Press the wheel and horn onto the armature of each servo and secure with the servo horn screw.
Step 4: Insert Ultrasonic Sensors


- Press the Ultrasonic sensor into the eye holes of the main body.
- Make sure the leads of the sensor or pointing up.
- You may also bend the leads so that they point straight backwards.
Step 5: Insert Battery Pack


- Load the battery pack with AA batteries
- Slip the pack in the slot in the back of the Waterbot
Step 6: Upload Code to Arduino.
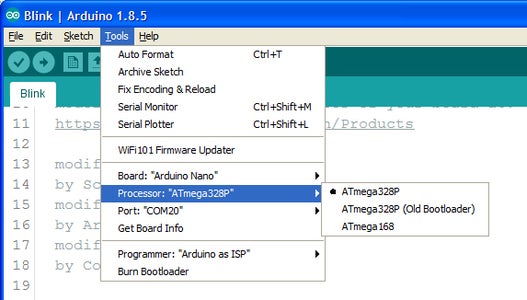
- Get the Latest Walter_OS or Waterbot Arduino Sketch from the downloads page of the LittleBots website.
- Using the Arduino IDE, upload the sketch to the arduino Nano.
Always make sure to upload the code before connecting the Bluetooth module. Bluetooth and USB will interfere with each other and create a bad serial connection.
Step 7: Prep Main Board


- Insert the Arduino Nano in to the main Board so that the USB Port point back towards the main power switch
- Plug in the bluetooth module into the bluetooth port as shown. Labels are also printed on the board for reference.
Step 8: Insert Main Board
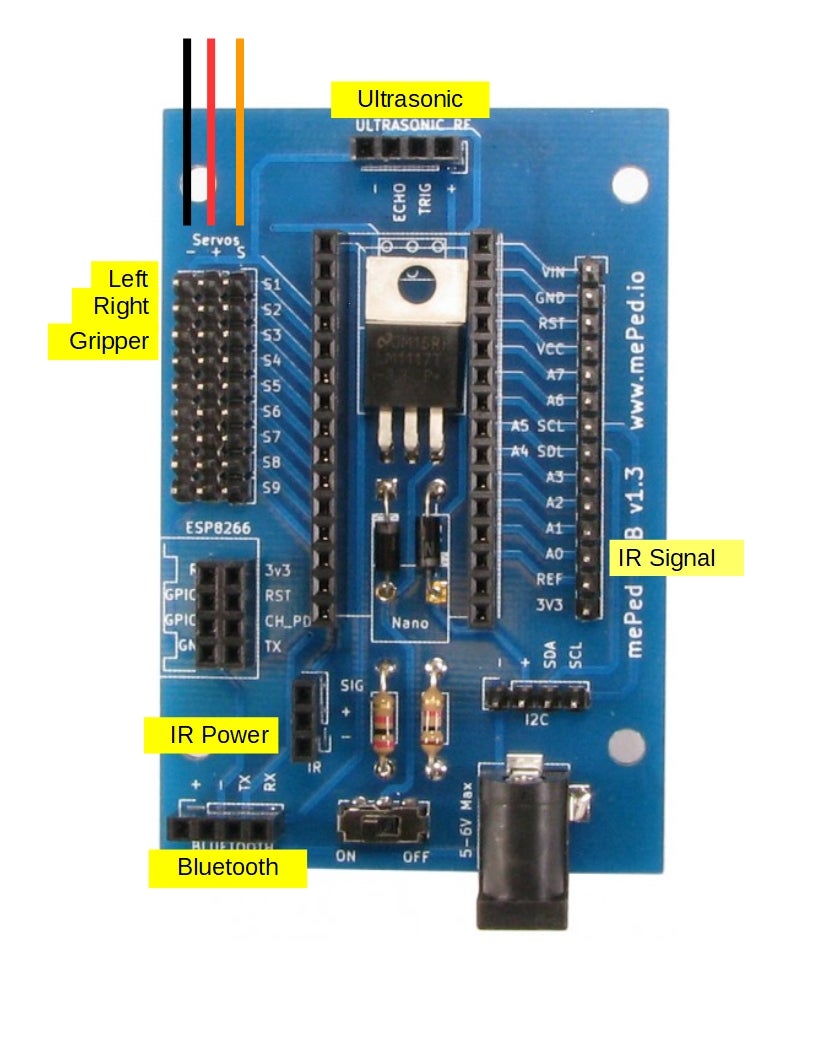


- Connect the Ultrasonic sensor to the main board
- Connect the left and right servo leads to the main board
- Slide the board into the the forward electronics compartment on the Waterbot, so that the bluetooth module is protruding out the back.
Step 9: Enjoy


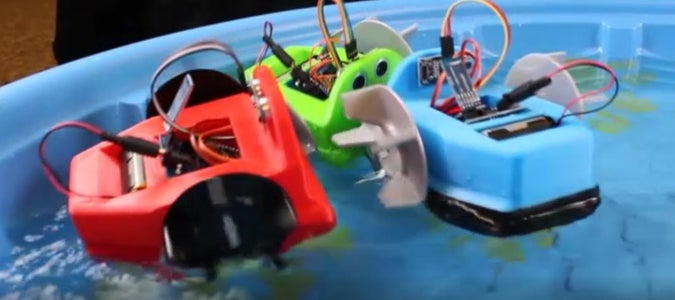
- Download the Littlebot app and Connect the bluetooth following the instructions in the video
- Start Enjoying. And maybe even edit the code to add new functions.
Let us know what you think of the Waterbot and what you do with him on our Facebook Page.


