

Introduction: Led Matrix 16x16


Hello,
This is my first instructable I've ever written, so excited to work on this :)
So in this project, I'm gonna show ya how to make this awesome 16 by 16 led matrix.
It's verry nice to build and you learn a lot while doing it.
Most of the time I just make stuf, because I like it, but this time I taught maybe it can be really functional.
First of all, you can use it as an beautiful decoration piece (almost art :) ), secondly, you can use it as an dimmable light source for your vid's.
So after al this blablabla, let's build stuff!!
Step 1: What Hardware (materials) Do You Need?

Most of the parts I found on ebay (words are hyperlinked), mdf and acrylic available in a local shop.
- Arduino nano (Belgium Link) or Uno (Belgium Link), I've used a Nano in this project, cause it's small and easy to hide ;)
- ON/OFF Switch
- potentiometer with knob of your choice
- 470 Ohm resistor
- 256 (16*16= 256) adressable rgb leds WS2812B (Belgium Link) (les if you want to build a 10 by 10 or 8 by 8 matrix)
- some 3 pin wire (I've use arround 7m I guess)
- 5V 20A powersuply
- Wood glue (Belgium Link)
- MDF sheets: 600mm by 300mm;
- 4 of 3mm (the matrix itself)
- 2 of 6mm (the edges and powerbox)
- 2 of 9mm (for the backplates)
- 58.85cm by 58.85cm acrylic (PMMA) sheet (not clear--> not a verry effective diffuser)
- Some stickers (Belgium Link) (optional, because it's lit af)
Step 2: What Tools Do You Need?

You need some tools, but if you are (like me) an enthusiastic DIY'er, you will have them arround.
Step 3: LaserCutting the Enclosure


I've made the hole enclosure out of MDF, it's cheap, duarble and it's easy to use.
I went to a local laser cut shop to cut the pieces out of a 300mm by 600mm mdf sheet.
See step 1 for the thickness of the sheets.
You can find the files for the pieces below. (you're welcome ;) )
Step 4: Put It Toghetter


First step is put all the mdf plates togheter,
you just glue all the pieces together like in the pictures, the 3mm plates have a little hole on one side,
this hole (rectangle cutout) are ment for cable management, so no light will escape the boxes :).
Just switch them the way you are wiring you led matrix.
You can start out of every corner; as long as you follow the S- patern (see picture) (I started in the upper left corner) (note; code will be different later on, but still solvable)
After you put the mdf together, you start glueing your leds and start soldering all the components like the schematic. ( this will take a lot of time, just be patient!)
Note: I see that I forgot to draw the resistor in the schematic, this one 470 ohm resistor must be placed between the digital pin on the arduino nano and the input of the first led of the matrix.
I've made some holes for the arduino nano, potentiometer and switch in the upper left corner of the matrix (side panels)
On the arduino I've used pin D9 for the leds (but schematic says 8? yes, but I've changed it ;), you can chose; al the digital pins will work --> just change the code later) and pin A1 for the potentiometer.
Step 5: Let's Power It Up


Uhh, I've put in the matrix but it doesn't work, ...
Well, ... that's because your Arduino nano doen't have any code to read ---> let's fix that.
First the simpel code (always the same, cause we are gonne you the serial connection over usb ;) )
Crucial notes:
- Serial connection doen't work wireless ;) (for Jinx see later, you must always plug in a usb cable)
- Before connecting arduino to pc, make sure you power your led matrix first from the wall outlet, if not; it will damage your pc, cause it drains a lot of current!!!!!!!!!!
- If you haven't already; you must install the FastLed Library, you can find this in the arduino IDE!
Jinx (files below)
What is Jinx, it's a program that renders pixels for led matrices.
How to use it;
- first go download all the files below
- unpack Jinx and install the arduino IDE (I guess, you already have that)
- change the ino file (if necessary) and upload it to your arduino nano (Board and COM-port must be correct)
- keep the usb cable connected
- run Jinx
- click setup --> matrix options and change your matrix size (mine 16 by 16 pixels)
- click setup --> output device and choose the correct one
- click setup --> start output
- enjoy the possibilities (just play arround)
Step 6: No Serial


I know right, you wanne get lost of the usb cable;
Well, there's a way, but it's a little harder to program this time, cause the code will be different for every picture/gif.
Instead of uploading the code for Jinx, use this ino file.
I't runs without Jinx and doesn't require a usb connection when uploaded.
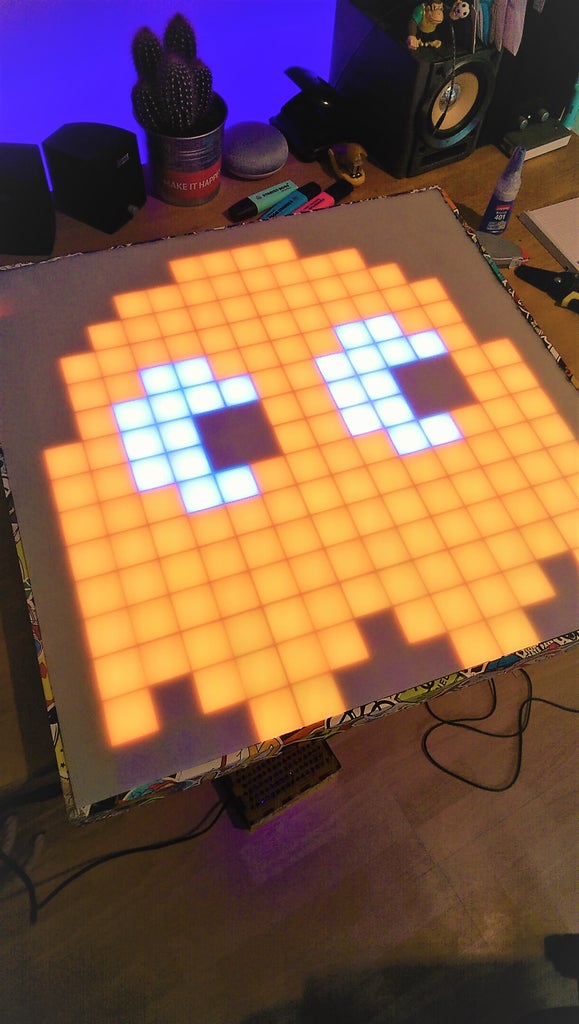
Especially for you guy's the one's that read the whole instructable; I upped a file named Spooky.ino.
It displays the 4 pacman phantoms you love ;)
Turn the potentiometer arround and find out what it does :p
You can tweak it arround and make your own if you want ;)
Step 7: Let's Rock That Party
Now you got your own.
So have fun and enjoy your selfmade RGB LedMatrix :p
Show it to your friends and family, post it in the reactions!!
If you got any questions, please ask, will do everything to help you guys!!
If you liked this project follow me and vote for this project, will upload more!
See you soon!!
Peace

Participated in the
Epilog Challenge 9

Participated in the
First Time Author Contest 2018


