

Introduction: How to Make an Automatic Fish Feeder

As part of our engineering studies we were asked to use an Arduino or/and a raspberry in order to solve a daily problem.
The idea was to make something useful and that we are interested in. We wanted to solve a real problem. The idea of making an automatic fish feeder came out after few brainstorming.
Have you ever forgot to feed your fish ? Or are you so busy that you don’t have much time to take care of it and it finishes to be part of the furniture ?
It happens to our friend every time because he comes back home late and the next morning, he has to leave home early. Sometimes his parents take care of his fish, but they also don’t have much time to do it every time. So, to solve this problem, we had this project idea which should interest you too.
As you should know, a fish needs some requirements to live in good conditions. The first one is the size of the aquarium which has to be big enough to give space to fishes to swim freely. The second condition concerns the water which has to be filtered permanently. This water has also to be aerated and partially renewed to decrease undesirable substances concentrations. Finally, the water has to be kept in an optimal range of temperature, depending of the kind of fish. And the third condition concerns the food. Indeed, the fishes have to be fed up to twice per day.
The aim of this project is to feed our fish everyday without thinking about it. For this, we also wanted to know the temperature of the water because fish need to be kept in an optimal range of temperature, depending of the fish species.
Because of the time constrain, in this project we will focus in feeding the fish and measuring the temperature.
In this project, you will find the way to rebuild our project for your own use. The model materials can be totally substituted by other components with different sizes, to adapt the project to your own aquarium. However, the main components will be described to you in this instructable.
At this rate, the main function is completed, but every project can be pushed further, improved and enhanced. So, feel free to improve this project by yourself in order to take care of our fishes.
Step 1: Components


Here is a list of the main components you will need to do this project:
- Arduino Mega
An Arduino Mega is an electronic card equipped with a microcontroller which can detect events from a sensor, to program and to command actuators. It is therefore a programmable interface. This interface is the main component of our project with which we supply the other components.
- Breadbord & wires
Next, we have the breadboard and wires which allow us to achieve the different electrical connections.
- Servomotor
Then, the servomotor which has the ability to reach predetermined positions and keeping them. In our case, the servomotor will be connected to a plastic bottle which would act as the fish tank. The rotation of the bottle allows to drop the food for the fish.
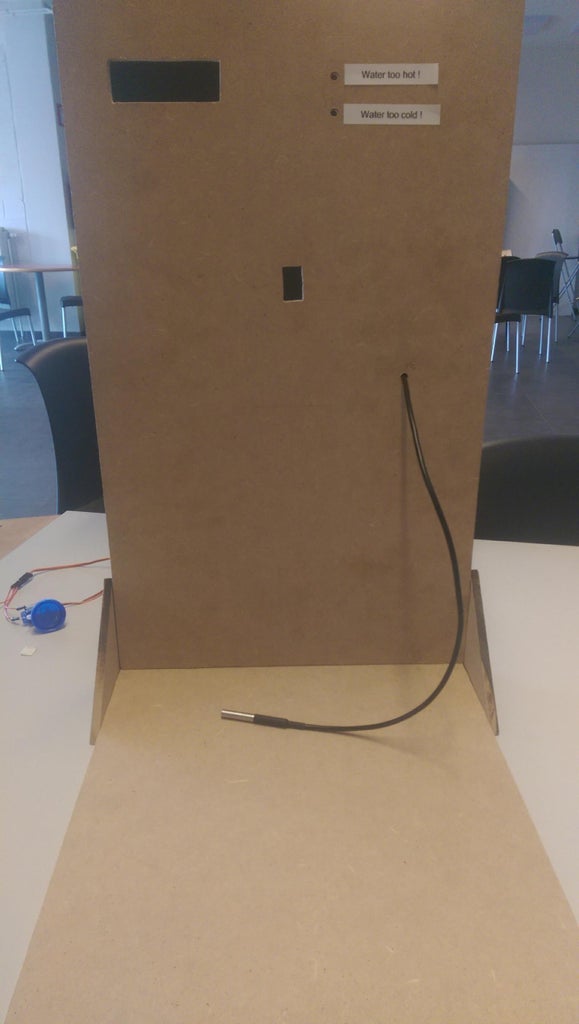
- Temperature sensor
We also have a temperature sensor. The sensor determines the temperature in the water and send this information via a 1-wire bus to the Arduino. The sensor can be used in temperature of -55 to 125°C, which is far more than what we need.
- LCD screen
The LCD screen is used to display the temperature information. You also need to use a 10 kΩ potentiometer to control the contrast of the screen and a 220 Ω resistor to limit the current in the screen.
- LEDs
You also need to use 2 LEDs to indicate if the water temperature is too high or too low
- Resistances
The resistances are mainly used to limit the current in some components.
-Plastic bottle
We took a plastic bottle as our fish food tank
You need to cut some holes in the bottle to let the food drop to your fish
Here is a table containing the prices of the components and where you can by them (picture 9)
Step 2: Wooden Panels Assembling


To begin, chose some wooden panels and cut the emplacement of your devices in one of the panels. By using some nails and the wooden panels, you can create your model.
Fix the two wooden panels together with a 90° angle (picture 2) and reinforce them with two wooden brackets (picture 3).
The electronic components will be placed in a plastic box, this box will be fixed behind the vertical wooden panel.
To do that, cut a hole in this box to pass the power cable (picture 4).
Then, fix it with a stapler on the wood panel (picture 5).
After that, place the LCD screen, the servomotor and the LEDs in their corresponding holes. Fix the plastic bottle on the servomotor (picture 6).
Step 3: Wiring


You need to use two Arduino to separate the code of the servomotor from the code of the LCD, the sensor and the LEDs. As the servomotor will rotate every 12 hours, the sensor will send temperature information to the LCD screen every 12 hours too if their codes are in the same program.
The first one will manage the sensor, the LCD screen and the LEDs. The second one will manage the servomotor.
For the sensor wiring, you will have to connect (Sensor -> Arduino):
- VCC -> Arduino 5V, plus a 4.7 kΩ resistor going from VCC to Data
- Data -> Any Arduino pin
- GND -> Arduino GND
For the LCD screen wiring, you will have to connect (LCD -> Arduino):
- VSS -> GND
- VDD -> VCC
- V0 -> 10 kΩ potentiometer
- RS -> Arduino pin 12
- R/W -> GND
- E -> Arduino pin 11
- DB0 to DB3 -> NONE
- DB4 -> Arduino pin 5
- DB5 -> Arduino pin 4
- DB6 -> Arduino pin 3
- LED (+) -> VCC through a 220 Ω resistor
- LED (-) -> GND
For the LEDs wiring, you will have to connect (Arduino -> LED -> Breadboard):
- Any Arduino pin -> Anode pin -> Cathode pin to GND through a 220 Ω resistor
For the servomotor wiring, you will have to connect (Servomotor -> Arduino):
- VCC -> Arduino 5V
- GND -> Arduino GND
- Data -> Any Arduino pin
You can see the final wiring in the pictures.
Step 4: Software
As we have two Arduino, we will also need two programs.
Each program is separated into three parts. The first one is about declaration of variables and include libraries.
The second part is the setup. It's a function used to initialize variables, pin modes, start using libraries, etc.
The last part is the loop. After creating a setup function, the loop function does precisely what its name suggests, and loops consecutively, allowing your program to change and respond.
You can find our codes in the joined file.
Attachments

Step 5: How It Works
Now, let’s see how the project works.
The Arduino MEGA is programmed to power the servomotor every 12 hours. This servomotor will allow the plastic bottle to make a 180° rotation and then to come back to its initial position.
You need to cut some holes in the bottle. So, when it turns, it will drop some fish food in the aquarium (the holes sizes depend of the size and the amount of the food you want to drop).
The temperature sensor will deliver an electronic message to the Arduino and the Arduino will communicate with the LCD screen to display the temperature on the screen.
If the water temperature isn’t between the optimal values (we put in the code [20°C; 30°C] depending of the fish species), one of the LED will be powered. If the temperature is below the range, the LED next to the message (“Water too cold!”) will be lit. If the temperature is above the range, then the other LED will be lit.
Step 6: Conclusion
In conclusion, we can say that the project is fully operational and it is able to execute its two main functions: feeding the fish twice a day and displaying the temperature with its two signals (LEDs) to prevent the limiting conditions of temperature for the fish.
Due to the restraint and our current knowledge, we couldn’t say that our project is a fully automated system. We couldn’t improve the project as we wanted, and therefore we suggest you some ideas to achieve this purpose:
- Water temperature regulation: The LCD screen can only display the information of temperature and indicate us the upper/lower temperature limit via the LEDs and have no influence on its regulation.
- Manual mode to feed the fish: Create the possibility to feed your fish by yourselves without having to wait 12 hours.
And so many other ideas that we let you imagine creating for your own and highly personalized fish feeder.


