

Introduction: Lathe Buffing System


I haven't had the need to buff anything larger than small metal objects in the past, but a few upcoming projects are much bigger. Looking at what is currently available, I didn't like anything on the less expensive side. Liking the setup of most lathe systems out there, I decided to make my own lathe buffing system. At a fraction of the cost and sized perfectly for my lathe, I built this buffing system in less time than it would have taken to receive anything purchased online.
In the final steps I share my tips on how to finish, polish, and buff a wooden vase.
Step 1: Tools and Materials


Materials:
- Buffing Wheels
- Tripoli Compound
- White Diamond Compound
- Carnauba Wax
- Natural Fiber Brush (I cut this one in half)
- 1/2 in. - 13 x 24 in. Threaded Rod
- 6 - 1/2 in. Washer
- 3 - 1/2 in. - 13 Nut
- 1 in. - 8 Spindle Tap
- 1/2 in. - 13 Tap
- 1/2 in. Black Steel Pipe
- Scrap Hardwood
- 16 d (penny) Nail
- Shurtape (strong double sided tape)
- Wood Finish
Tools:
- Lathe
- Clamps
- Angle Grinder or Hack Saw
- 7/8 in. Drill Bit
- 13/32 in Drill Bit
- Table Saw
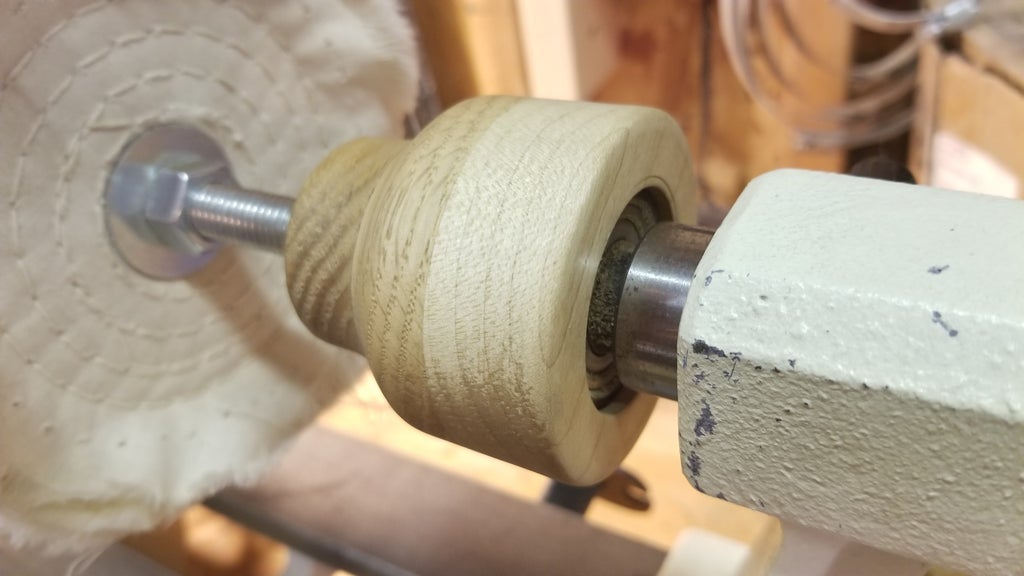
Step 2: Glue Faceplate


Using scrap walnut, glue together a cube that will act as the interface between the headstock and the threaded rod. Glue the pieces together with alternating grain directions. This will strengthen the block and hopefully reduce the chances of it breaking.
This block ended up being about a three inch cube.
Step 3: Cut Threaded Rod

Using a hacksaw or angle grinder, cut the threaded rod 2 to 3 inches longer than the distance from the tip of your head stock to your tailstock. A small portion of this rod will fit inside your headstock. This is a fail safe on the off chance that the walnut interface breaks, the buffing wheels will not come off the lathe.
Step 4: Insert Spindle Threads in Coupling


Mount the block to a faceplate with double sided Shurtape or hot glue.
Drill a 7/8 in. hole in the middle of the block. Using a spindle tap mounted between the hole and the tailstock, lock the spindle. Use an adjustable wrench with constant pressure from the tailstock to turn the tap and cut threads in the wood. Once cut, add a chamfer and thread clearance for the headstock. Remove the coupling and mount it directly on the headstock.
Step 5: Insert Threads in Coupling


Turn the coupling round and drill a 13/32 in. hole through the coupling. Using a 1/2 in. tap made from a bolt (see this instructable of mine) insert threads in the coupling. Add a chamfer to the threads, sand, and finish the wood. I used this wood conditioner.
Step 6: Insert Locking Pin


Insert the threaded rod through the entire coupling block until it is flush with the back side of the block. Drill a hole through the coupling and the threaded rod. Insert a 16 d nail to lock it in place and cut off the excess using a hacksaw.
Step 7: Create Endcap


Mount a 1 1/2 in. square of scrap wood in a nova chuck. Following the same process as step 5, insert threads in the cap. Glue another piece of wood to the threaded piece using the tail stock to apply pressure. Once dry, turn the endcap round and apply the finish.
If you are worried about engaging the tail stock in the final buffer, you can add another layer of wood and bore out the center the size of your live center.
Step 8: Shine Spacer Tubes


Mount a 1/2 in. pipe on the lathe and sand until it has a desired shine. Cut the tubes to any length that will fit on your lathe. For my Midi lathe, 6 in. was the perfect length.
Step 9: Mount and Finish Buffing System


Place two nuts on the threaded rod first. These two nuts will lock against each other to prevent the system from becoming loose while in use. Place a washer on both sides of each buffing wheel. Use the spacer tubes from the previous step between each wheel. Because the threaded rod is a little bit smaller than the inside diameter of the tubes, use some painters tape to act as spacers. Center and tighten the wheels on the rod.
Step 10: Apply Finnish


My favorite finish to use with this buffing system is danish oil. Any drying finish is able to be buffed, however be careful with surface finishes such as lacquer as you can easily buff through the finish. This buffing system isn't a replacement for sanding, but is to go above and beyond sanding. For a high gloss finish, sand any piece to be buffed to 600 grit sandpaper. For this demonstration, I will be finishing and sanding a wooden vase made from an old piece of firewood (not sure what the species is). Soak the vase in danish oil for an hour or two. I used a scrap piece of metal to keep the vase submerged in the oil. Once finished soaking, remove the vase an wipe off the excess oil. Allow any finish to dry for at least a week before attempting to polish it.
Step 11: Make It Shine!


This image shows what a dramatic effect buffing your project can have. It compares bare wood, danish oil, and after the buffing process.

Be sure to wear proper PPE as buffing compound is an abrasive. Probably not a good idea to breathe it in or get it in your eyes.
To buff wood, you want to start with a clean buffing wheel. Use a scrap piece of wood to scrape off old buffing compound. Apply an ample amount of tripoli compound to your first wheel by rubbing it on while the wheel is moving. Buff the wood on the underside of the wheel. This will keep it from being thrown at you if you happen to lose grip. Always keep the wood moving to reduce heat building up and burning the wood. Once you have buffed the entire piece, take a natural bristle brush and scrub the piece (especially if it has cracks or voids like this vase does). This will remove all excess buffing compound to avoid cross contamination from wheel to wheel. Repeat the same process with white diamond buffing compound on the second wheel.
For the final wheel I used carnauba wax. This wax is perfect for high gloss finishes like this because it has a high melting temperature and is hard compared to other waxes like beeswax. Apply wax to the wheel the same way as the previous wheels, however you want to pay attention when you start buffing. Wax will smear if you apply too much to the wheel. If you are noticing wax building up on the wood, scrape off excess wax from the wheel with a piece of scrap wood and start over applying less to the wheel.

Participated in the
Pro Tips Challenge


