

Introduction: The Perfect Automatic Lighting System Using Arduino + LDR + PIR


In this project,We will set up an automatic lighting system using arduino, so the ideas came when I tried to build automatic lighting system using arduino and PIR motion sensor but I confronted big issue because the light turn ON even if daytime,this is why I thought to use LDR in order to solve this issue.
The main purpose of this project is to prevent loss of current unnecessarily during day time and make the system more efficient then before.
Step 1: Hardware/Software Supplies


Hardware Supplies:
1. Arduino Uno ( any other arduino board will be just fine as long as it provides an Analogical pin ).
2. PIR Motion Sensor
3. LDR (Photoresistor)
4. 10 KOhms resistor
5. Relay module
6. Lamp
7. Breadboard (optional)
Software Supplies:
1. Arduino IDE
Step 2: Specifications of the Main Components
PIR sensor:
The PIR sensor stands for Passive Infrared sensor. It is a low cost sensor which can detect the presence of Human beings or animals. There are two important materials present in the sensor one is the pyroelectric crystal which can detect the heat signatures from a living organism (humans/animals) and the other is a Fresnel lenses which can widen the range of the sensor. Also the PIR sensor modules provide us some options to adjust the working of the sensor as shown in above image.
LDR resistor:
A photoresistor (or light-dependent resistor, LDR,or photo-conductive cell) is a light-controlled variable resistor. The resistance of a photoresistor decreases with increasing incident light intensity.a photoresistor is made of a high resistance semiconductor. In the dark, a photoresistor can have a resistance as high as several megohms (MΩ), while in the light,a photoresistor can have a resistance as low as a few hundred ohms.(Source : Wikipedia )
Step 3: Watch the Video for More Details
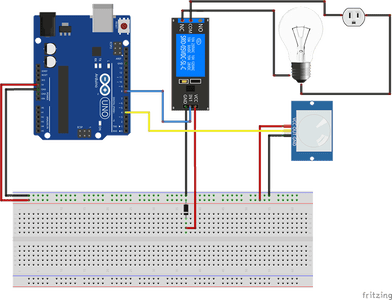
Step 4: Circuit Assembly


To make the circuit assembly more easy I will explained in Two parts :
1. Arduino and LDR
The schematic is quite simple you should just follow the instructions bellow :
1.Connect one of the LDR leg to the VCC (5v of the Arduino).
2.Connect the other LDR leg to the A4 pin Of Arduino and also to the resistor
3.Connect the (empty) resistor to the GND of the Arduino.
Note: You can see all the connections in the picture above.
2. Arduino and PIR motion sensor
The PIR sensor has three pins :
1. VCC
2. GND
3. OUT
We have powered the PIR sensor using he 5V Rail of the Arduino. The output pin of the PIR Sensor is connected to the 8thdigital pin.Then, you have to wire the ''GND'' to the Arduino's ''GND''.
In this project, we use relay for controlling AC light because the Arduino cannot control high volt , but a relay can do this job, which is the sole design of it. so we are using relay as switch to control high power devices.
There are two ways to assembly the relay connection :
1. NC = Normally Closed Connection ( which I'm going to use ).
2. NO = Normally Open Connection.
so you have to wire the relay's ''OUT'' to the 8th digital pin of the arduino uno.
Then the relay's ''GND'' to the arduino's ''GND'' and ''VCC'' to the ''VCC''.
Step 5: Arduino Code

About the code :
#define LAMP  8  // choose the pin for the RELAY
#define PIR 13   // choose the input pin (for PIR sensor)
void setup()
{
Serial.begin(9600);
  pinMode(LAMP, OUTPUT); // declare lamp as output
  pinMode(PIR,INPUT); // declare sensor as input
void loop()
{


  int value_ldr = analogRead(A4); // read LDR value
  int value_pir = digitalRead(PIR); // read input value
  Serial.println(value_ldr);
  Serial.println(value_pir);

 if((300>value_ldr) && ( value_pir==HIGH) ){
       digitalWrite(LAMP,1);  // Turn ON the light
       delay(6000);


}
else {

       digitalWrite(LAMP,0); // Turn OFF the light

}
 }
Step 6: For Support

You can subscribe to the my YouTube channel for more tutorials and projects.
Subscribe for support. Thank you.
Go to my YouTube Channel -link https://goo.gl/EtQ2mp

Participated in the
Arduino Contest 2017


