

Introduction: Arduino LCD 16x2. Turn Single Screen Into Multiple Screens.


Hi! Do you think your lcd is not bigger enough for your project? What if i tell you maybe you are wrong and with a simple code trick and two buttons you can enlarge your lcd and create sub screens to show more data or messages, and with an extra button we can create an eficient interface to navigate beetwen pages and change states and setpoints.
Also, this tutorial is useful if you have reduced space for your project.
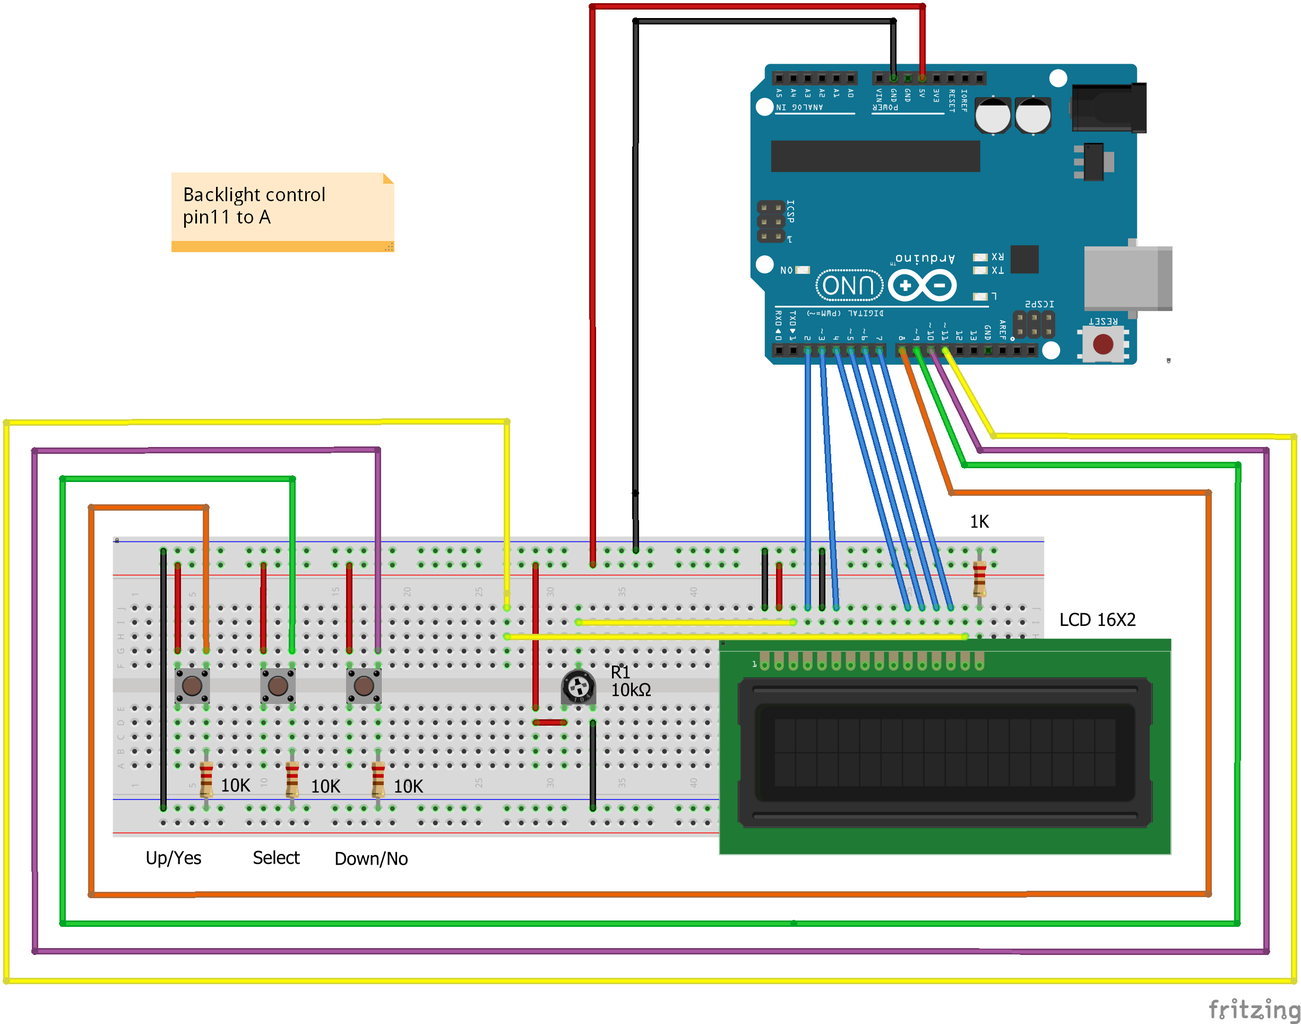
I have divided this tutorial into 5 progresive steps to understand the code better.From simple menus to nice functions like auto return , auto scroll, backlight auto off and a functional interface. Also, i have included fritzing schematics and a video!.
Maybe the codes seems complex, but are just a few instructions repeated several times for the different items.
Materials
-Arduino UNO
-Lcd 16x2
-10K trimpot
-Push buttons x3
-10K resistor x3
-RGB led (I am using a common cathode module)
-Led
-220 ohm resistor
-Breadboard,jumpers,wires, etc.
Step 1: Basic Multiple Screen

I will assume you are familiar with lcd 16x2 and his functions. First, mount the circuit.
To get multiple screens we will create a variable called "page_counter" and the default value is 1 (first page or home page).
int page_counter=1 ; //To move beetwen pages
With the buttons we add or subtract 1 and move the counter from 1 to 3 (total of pages). I have used the next function to use push buttons (worked for me for years) they are configured as pull down, that means the pin are always conected to gnd by 10K resistor (LOW) and when you press the button will be conected to 5v (HIGH). Let´s take the pin8 (up button) as example:
1)_Declare pin 8 .Normally, i put the same name of what will do, in this case "up".Will be called later by a custom function
int up = 8; //Up button
2)_Create and store the states (last and current) as boolean. I use the name of function as prefix "_up" to don´t mess the code.
boolean current_up = LOW;
boolean last_up=LOW;
3)_Create a custom function to read pins and "watch" if the state of pins has changed (from low to high) and return what pin state has changed. As i have said, this is a custom function and is not inside void setup or void loop and works for all buttons , so you don´t need to repeat.
//---- De-bouncing function for all buttons----//
boolean debounce(boolean last, int pin) {
boolean current = digitalRead(pin);
if (last != current) {
delay(5);
current = digitalRead(pin);
}
return current;
}
4)_Inside void loop. Create the de-bounce function to call custom function
current_up = debounce(last_up, up); //Debounce for Up button
5)_Inside void loop. Use the function!!
if (last_up== LOW && current_up == HIGH){
...Do what you want...
}
last_up=current_up //store the last state of button
In this case, will add 1 if is lower than 3, if the page is higher than 3 (else function) you will stay on page 3 (last page). If you want to go from page 3 to home page 1 (cyclic), change
page_counter=1; You will see that on the auto scroll step.
//Page Up
if (last_up== LOW && current_up == HIGH){ //When up button is pressed
lcd.clear(); //When page is changed, lcd clear to print new page
if(page_counter <3){ //Page counter never higher than 3(total of pages)
page_counter= page_counter +1; //Page up
}
else{ // If page higher than 3 , stay on page 3
page_counter= 3;
}
}
last_up = current_up;
Note that the first action when you press the button is lcd.clear(),so when you press a button the lcd is clear to print the new page. At the end, always store the last state of buttons! (last_up=current_up)
The real trick here is to asign an entire page to the "counter_page" number. For that, we will use the Switch function.
So we start by declaring switch variable is page_counter and will have the value 1, 2 or 3 (number of pages). I am making this tutorial with 3 pages, but you can add as many pages as you want (well....as the memory want). The diferent screens will show you a message,but here you can display your messages , values of sensors, etc. Use every "case" as normally use a single lcd.
switch (page_counter) {
case 1:{ //Design of home page 1
lcd.setCursor(5,0);
lcd.print("This is");
lcd.setCursor(5,1);
lcd.print(" Home Page");
}
break;
case 2: { //Design of page 2
lcd.setCursor(5,0);
lcd.print("This is");
lcd.setCursor(4,1);
lcd.print("Page 2");
}
break;
case 3: { //Design of page 3
lcd.setCursor(1,0);
lcd.print("You are now on");
lcd.setCursor(4,1);
lcd.print("Page 3");
} break;
}//switch end
}//loop end
Watch the video!!
Attachments

Step 2: Auto Scroll Function
This is another simple trick. Will change the page without press any button at the time interval you want.Very useful to show the info of diferent screens.Here we introduce the use of millis . Millis are very useful and let you take some actions at specific time without stop the program, a very good alternative instead the use of delay. You can always use the buttons, but if there is no action (button pressed) the counter will start and when the interval time is reached , will go to the next page an so on. If you press any button the counter will be reset. The counter is displayed on left bottom corner and let you see the counter status.
The code has some modifications.
1)_ Introduce the following variables to establish the first state of millis(0) and the desired wait time (interval).
//Variables for auto scroll
unsigned long previousMillis = 0;
unsigned long interval = 10000; //Desired wait time 10 seconds
2)_ Now when use the up button and the counter is 3 (last page) it will go to page 1 and when use the down button and the counter is 1 (first home page) it will go to page 3. This allow to rotate from 1 to 3 and return to 1 and vice versa ( code line 64 and 78)
3)_Inside void loop. We take the current millis. This is like to watch your clock and know what time is.The first state is 0 (unsigned long previousMillis = 0;) and will run untill the diference is equal to interval time(10000) When interval is reached , add 1 to page_counter and change page. Remember that 10000 millis are 10 seconds. Then the previousMillis variable will be replaced by the last millis and so on. As the clock example, if you need to do something every 10 minutes and start from 12 o´clock, You watch your clock and wait to 12:10 and do something, then 12:10 is your new start point and wait to 12:20 and so on...
unsigned long currentMillis = millis(); //call current millis
lcd.setCursor(0,1); // Show millis counter status
lcd.print((currentMillis-previousMillis)/1000);
if (currentMillis - previousMillis > interval) { //If interval is reached, scroll page
previousMillis = currentMillis; //replace previous millis by current millis as new start point
lcd.clear(); //lcd clear if page is changed.
if (page_counter <3){ //Page counter never higher than 3 (total of pages)
page_counter = page_counter +1; //Go to next page
}
else{
page_counter=1; //if counter higher than 3 (last page) return to page 1
}
}
4)_ If any button is pressed the counter is reset. In other words,previous millis will be replaced by current millis
if (digitalRead(8) == HIGH || digitalRead(10)==HIGH){ // Reset millis counter If any button is pressed
previousMillis = currentMillis;
}
You can use longer time interval if you want.
Step 3: Auto Return Function
This function is based on the previous step and when time interval is reached, will return to home page.
The code works the same as auto scroll, but instead to add 1 to page_counter , will set page_counter to 1 (home page) and the same, if any button is pressed , the counter will be reset.
//-----------Auto return function---------------//
unsigned long currentMillis = millis();
lcd.setCursor(0,1); // Show millis counter status
lcd.print((currentMillis-previousMillis)/1000);
if (currentMillis - previousMillis > interval) { //If interval is reached, return to home page 1
previousMillis = currentMillis;
lcd.clear();
page_counter = 1;
}
if (digitalRead(8) == HIGH || digitalRead(10)==HIGH){ // Reset millis counter If any button is pressed
previousMillis = currentMillis;
}
Step 4: Making a Sub Menu Interface

At this point, we only show messages on the lcd. Let´s make something functional. Now we can control/show more variables than with a single lcd. For this example, we will control a rgb led and the brightness of a single led. Here i introduce a thirth button (select) to move the submenus, works increasing the sub page counter and changing the position of a cursor beetwen items.
In order to use only 3 buttons, we need to disable up and down buttons to make them work on sub menus. For that, an "if" statement is set: up/down buttons only work if sub page counters are 0 ,so when select button is pressed, sub page counter will be increased and will disable up/down buttons and now they can be used on submenus, to activate or increase values on submenus items.
Based on the multiple screens code, we add variables for submenus (page 2 and 3).
int subpage_counter=0; //To move submenu 1 RGB
int subpage2_counter=0; //To move submenu 2 Led
-Declare all pins we will use. Pin 11 will be used on "led brightness" because is pwm. Pin A5 (analog) configured as output to control blue led.
//-------Pins-----//
int up = 8; //Up/Yes button
int sel = 9; //Select button
int down = 10; //Down/No button
int led = 11; //Led (pwm output)
int red = 13; //red color
int green =12; //green color
int blue = 19; //blue color (A5 as output)
-Add select button state
boolean current_sel = LOW;
boolean last_sel = LOW;
-Declare inititial state of leds.
//--------Led states-----------//
boolean red_state = LOW;
boolean green_state = LOW;
boolean blue_state = LOW;
int led_lum =00;
-Two custom characters has been created :arrow , to indicate the position of what we want to change. Back, to indicate submenu exit.
Characters was created here:
https://omerk.github.io/lcdchargen/
-Inside void setup, we declare pin modes and custom characters.
void setup() {
// Declare pin modes
pinMode(red, OUTPUT);
pinMode(green, OUTPUT);
pinMode(blue,OUTPUT);
pinMode(led,OUTPUT);
lcd.begin(16,2);
lcd.createChar(1, back);
lcd.createChar(2, arrow);
}
Void loop
-"If" statement for up/down buttons
if(subpage_counter==0 && subpage2_counter==0){ // up/down buttons enabled if subcounters are 0,Disabled if 1,2..etc to work on submenus
...Up function...
...Down function...
}
Switch
- Case 1: show "Led Control" as home page(no actions here)
- Case 2: We start with the static objects.Then, select button will go from 0 to 4 (R, G, B, Back) when pressed and will set the cursor in front of items. At the same time, that position let us take some actions(turn on leds and exit submenu). Note that when we change position, the first action is delete the last position of cursor (lcd.print(" "); //Delete last arrow position) just writing nothing. If you press "yes" the code change the led state(LOW to HIGH) , "N" to "Y" and led will turn on (change led state ), and the oposite if you press "no". This function is repeated for all leds or subpage_counter 1,2,3. If you press "yes" when cursor is in front of "back" character (subpage_counter=4), subpage_counter will be 0 and exit the submenu and the Up/Down buttons are now enabled to move the pages. if you press "no" subpage_counter will be 1 to start again.
-Case 3:Works almost the same as the previous function, with two positions(subpage2_ counter=1 or 2). Here we move led_lum variable from 0 to 10. Then we compare led_lum with pwm function, where 0 is analogWrite=0, 1 is analogWrite=25,........10 is analogWrite=225.
After Switch function, we check the led states(R,G;B) and turn on or turn off.
Sub_counter page status are displayed on the top left corner.
Watch the video to see how it works!
Now, you can apply and improve the code, to be be used on your projects and turn on devices or change setpoints,etc.
Attachments
Step 5: Backlight Auto Off and Contrast Control

We know how to use millis and control led brightness. Why don´t we use it on lcd backlight or contrast ?. Useful if you want to save power or make your project look nice.
Here you have 3 codes:
1-Backlight auto off. If you are not using the lcd, the millis counter function will turn off the lcd backlight and will turn on if you press any button.Use "Backlight control" schematic
2-Backlight fade. The same previous function, but this time if "backlight" is low, will decrease the output of pwm pin 11 from 255 to 0. If you press any button, the pwm output will be increased fom 0 to 255. Use "Backlight control" schematic.
3-Backlight or contrast control. Using the same code on step 4 , connect VO (contrast) or A (lcd anode) to pin 11 (pwm) and adjust the contrast with the led brightness function. If you want to use this function, try not to start from 0 , use 5 as medium initial value (led_lum)
I hope this tutorial helps you!!


