

Introduction: Part Holder for Drill Press


The goal of this ible is to guide you through the building process of the small parts holder. I built this specifically for drilling pen blanks, but it can obviously be used for far more than this. Furthermore, this is a great project to do with mostly scraps / leftovers, which makes it even better in my book!
Step 1: Material

You will need the following
- material for your base and second sacrificial base. The minimum you want is 2x 6 inches x 6 inches and at least 1/2 inch thick.
- Material for the arms / gates. For this you want 2x at least 3 inches high, 1 foot long, and 3/4 thick or more. I used an old 2x3 stud.
- Drill
- Hinge
- Fasteners. I used screws and wood glue, but I am very partial to glue. In my experience, wood glue far outlasts screws when applied properly. If you can, get 3/4 inch screws, but otherwise, just deal with what you have, nothing wrong with that.
- A saw of some sort. If you only have one, a hand saw or circular saw are what you need. If you have the luxury of having accumulated many tools over the years as I have, then you can use a miter saw and table saw. Any one of those alone will do, but it will require a bit more finagling.
- Clamps are always good to have laying around. If you have some, they will make your life much easier.
And since this is for using with a drill press, I obviously recommend a drill press :p But really this can be used for all sorts of projects. This is the one that was gifted to me by a generous soul. Again, a big thank you.
Step 2: Cut Your Arms Off

No no, not YOUR arms, cut the lengths of wood that will be the swing arms to your contraption. I do this first as it serves as the indication for how big your bases will be.
Step 3: Measure Out the Bases

The real base to which one arm will be attached should go about 6 inches out, and only needs to be about 3-4 inches wider than the arm. So place the arm on the base, and scribe your sacrificial base for cutting. You want the sacrificial base to be shorter as well. The space in the back will allow wood chips to fall out instead of jamming up the hinge.
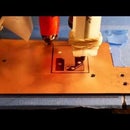
Step 4: Cut a Groove


You will want a grove at the same distance in both your arms. You want it about half way on your base. Just mark, and cut.
Step 5: Assemble Part 1

First, secure the first arm along the long edge of your base. I used clue and screws. Next, position your sacrificial base. You can secure it now or not at this point, go with your workflow here. The important part is to align the second arm on top of it, and scribe along the top edge to make both arms flush in height.
Step 6: Rip and Finish Assembling


Once you have ripped the second arm to proper height, you can now install the hinge, and secure the sacrificial base.
That's it! No more bloody fingers!


